⚠ This page is outdated. For more recent information have a look at the english original.
Install Ink/Stitch on Linux
Requirements
Ink/Stitch is an Inkscape extension. Download and install Inkscape Version 1.0.2 or higher before you install Ink/Stitch.
Installation
Download the latest release (Ink/Stitch v3.0.1) for Linux
Install deb package
Double click on the downloaded deb file and follow the installation process.
Install rpm package
Double click on the downloaded rpm file and follow the installation process.
Install with the installer script
Use this version if you are using the AppImage version of Inkscape or if you just want to install Ink/Stitch only for your own user. This script is also useful if your system doesn't support deb or rpm packages.
Open your terminal and navigate to the folder where the downloaded script is located, e.g.
cd DownloadsRun the following command
sh inkstitch-3.0.1-linux.shExpert options
This script will attempt to determine where to install Inkscape user extensions automatically. If it gets it wrong, you can set one of these environment variables:
-
INKSCAPE_PATH (ex: /usr/bin/inkscape)The path to the inkscape executable program. This script will ask that program where to install extensions by passing it the --user-data-directory argument.
-
INKSCAPE_EXTENSIONS_PATH (ex: $HOME/.config/inkscape/extensions)The path to the inkscape extensions directory. Use this to bypass the --user-data-directory method and specify a directory yourself.
If you'd rather install it yourself, run this script with --extract to produce the original inkstitch-<version>.tar.xz file in the current directory.
Install with tar.xz archive
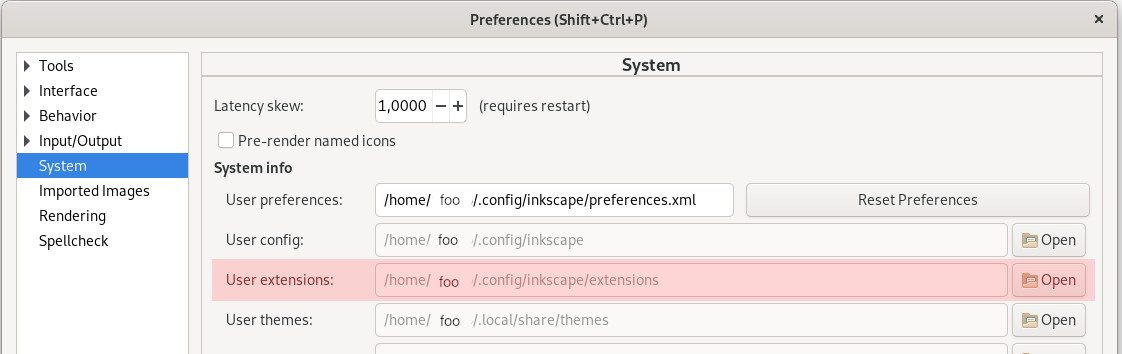
Go to Edit > Preferences > System and check where your User Extensions folder is.
Extract the Ink/Stitch archive into this folder.
$ cd ~/.config/inkscape/extensions
$ tar -xvf ~/Downloads/inkstitch-3.0.1-linux.tar.xz
Latest release: 30.06.2023 Ink/Stitch v3.0.1
Run Ink/Stitch
Restart Inkscape.
You will then find Ink/Stitch under Extensions > Ink/Stitch.
Update Ink/Stitch
Recent Versions
If you want to update a deb or rpm install, just download the new package and run the installation as described above. It will replace the old installation.
The installer script will also remove the previously installed Ink/Stitch version before it installs Ink/Stitch.
This is only true for previous installation which used the same method. If you installed Ink/Stitch in an other way please follow the instructions for older updates first.
Versions older than Ink/Stitch v2.1.0 or tar.xz version
Delete the old extension files first. Go to the extension directory and remove each inkstitch* file and folder.
Then, proceed as above.
The extensions directories can be seen in Inkscape under Edit > Preferences > System.
Getting informed about Updates
Subscribe to a news feed channel to keep track on Ink/Stitch Updates:
- GitHub Feed on new Releases
- Ink/Stitch News
-
Or follow the project on GitHub
Troubleshoot
Ink/Stitch doesn’t run / is greyed out
Confirm installation path
Check if you extracted Ink/Stitch into the correct folder. If the User extensions folder doesn’t work out correctly, you can also try to install into the Inkscape extensions folder.
You can also look it up under Edit > Preferences > System.
Confirm Ink/Stitch Version
Verify if you have downloaded Ink/Stitch for Linux (Download)
Confirm ownership/permissions
Some users report false ownership/permissions can cause this issue.
AttributeError: ‘NoneType’ object has no attribute ‘title’ in inkstitch.py
This error has been reported to us by users who have installed Inkscape through snap. Snap is known to cause issues for Ink/Stitch to run with Inkscape. Please try an other installing method. Any described on https://inkscape.org/ will be fine.
Ink/Stitch dialogs disappear after a few seconds
This issue can be caused by wayland. Start Inkscape with the following command: export GDK_BACKEND=x11 && inkscape.
This workaround has to be used until we moved all Ink/Stitch applications to the electron environment.
I installed Ink/Stitch in my native language, but the dialogue windows are displayed in English
Incomplete Translation
It is possible, that not all strings have been translated. This is indicated by some strings of text being in English and others in your native language. If you like to complete the translation, have a look at our description for translators.
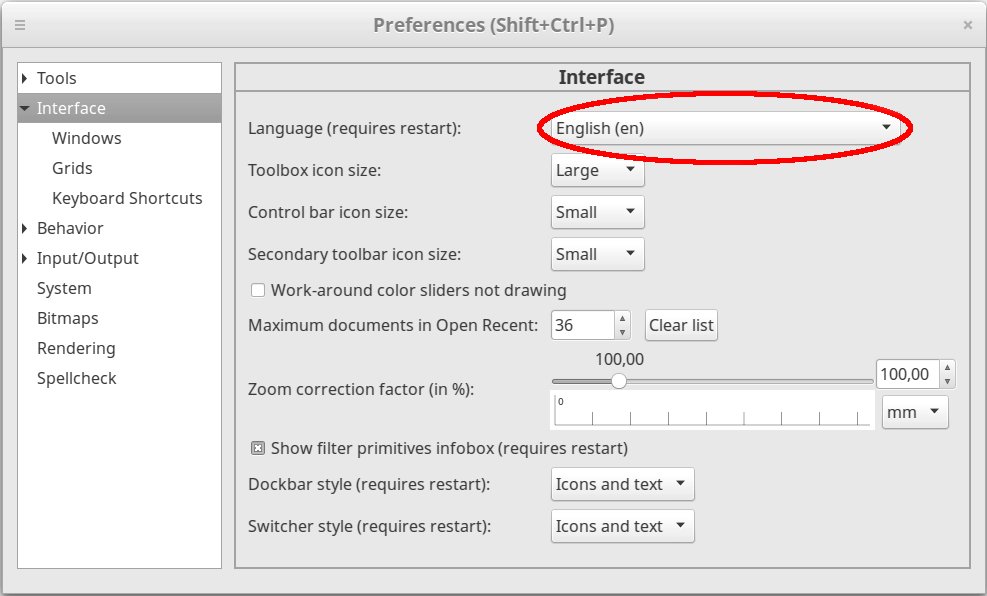
Language Setting
We have to distinguish between the Extension menu in Inkscape and the dialogue windows. The selection of the ZIP file causes only the Extension menu to be in a certain language. The dialgoue windows are build differently. They will use the language of your operating system. If Ink/Stitch is uncertain, which language to support, it will fallback on English. You can tell Inkscape explicitly to use your native language as follows:
- Go to Edit > Preferences > Interface (Ctrl + Shift + P)
- Set your language
- Restart Inkscape