Self-Made Embroidery Machine (Running on G-Code)
A project by jameskolme.
Introduction
So, what is what and how does it work?
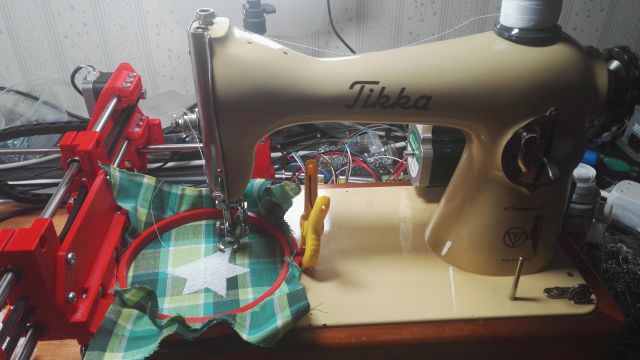
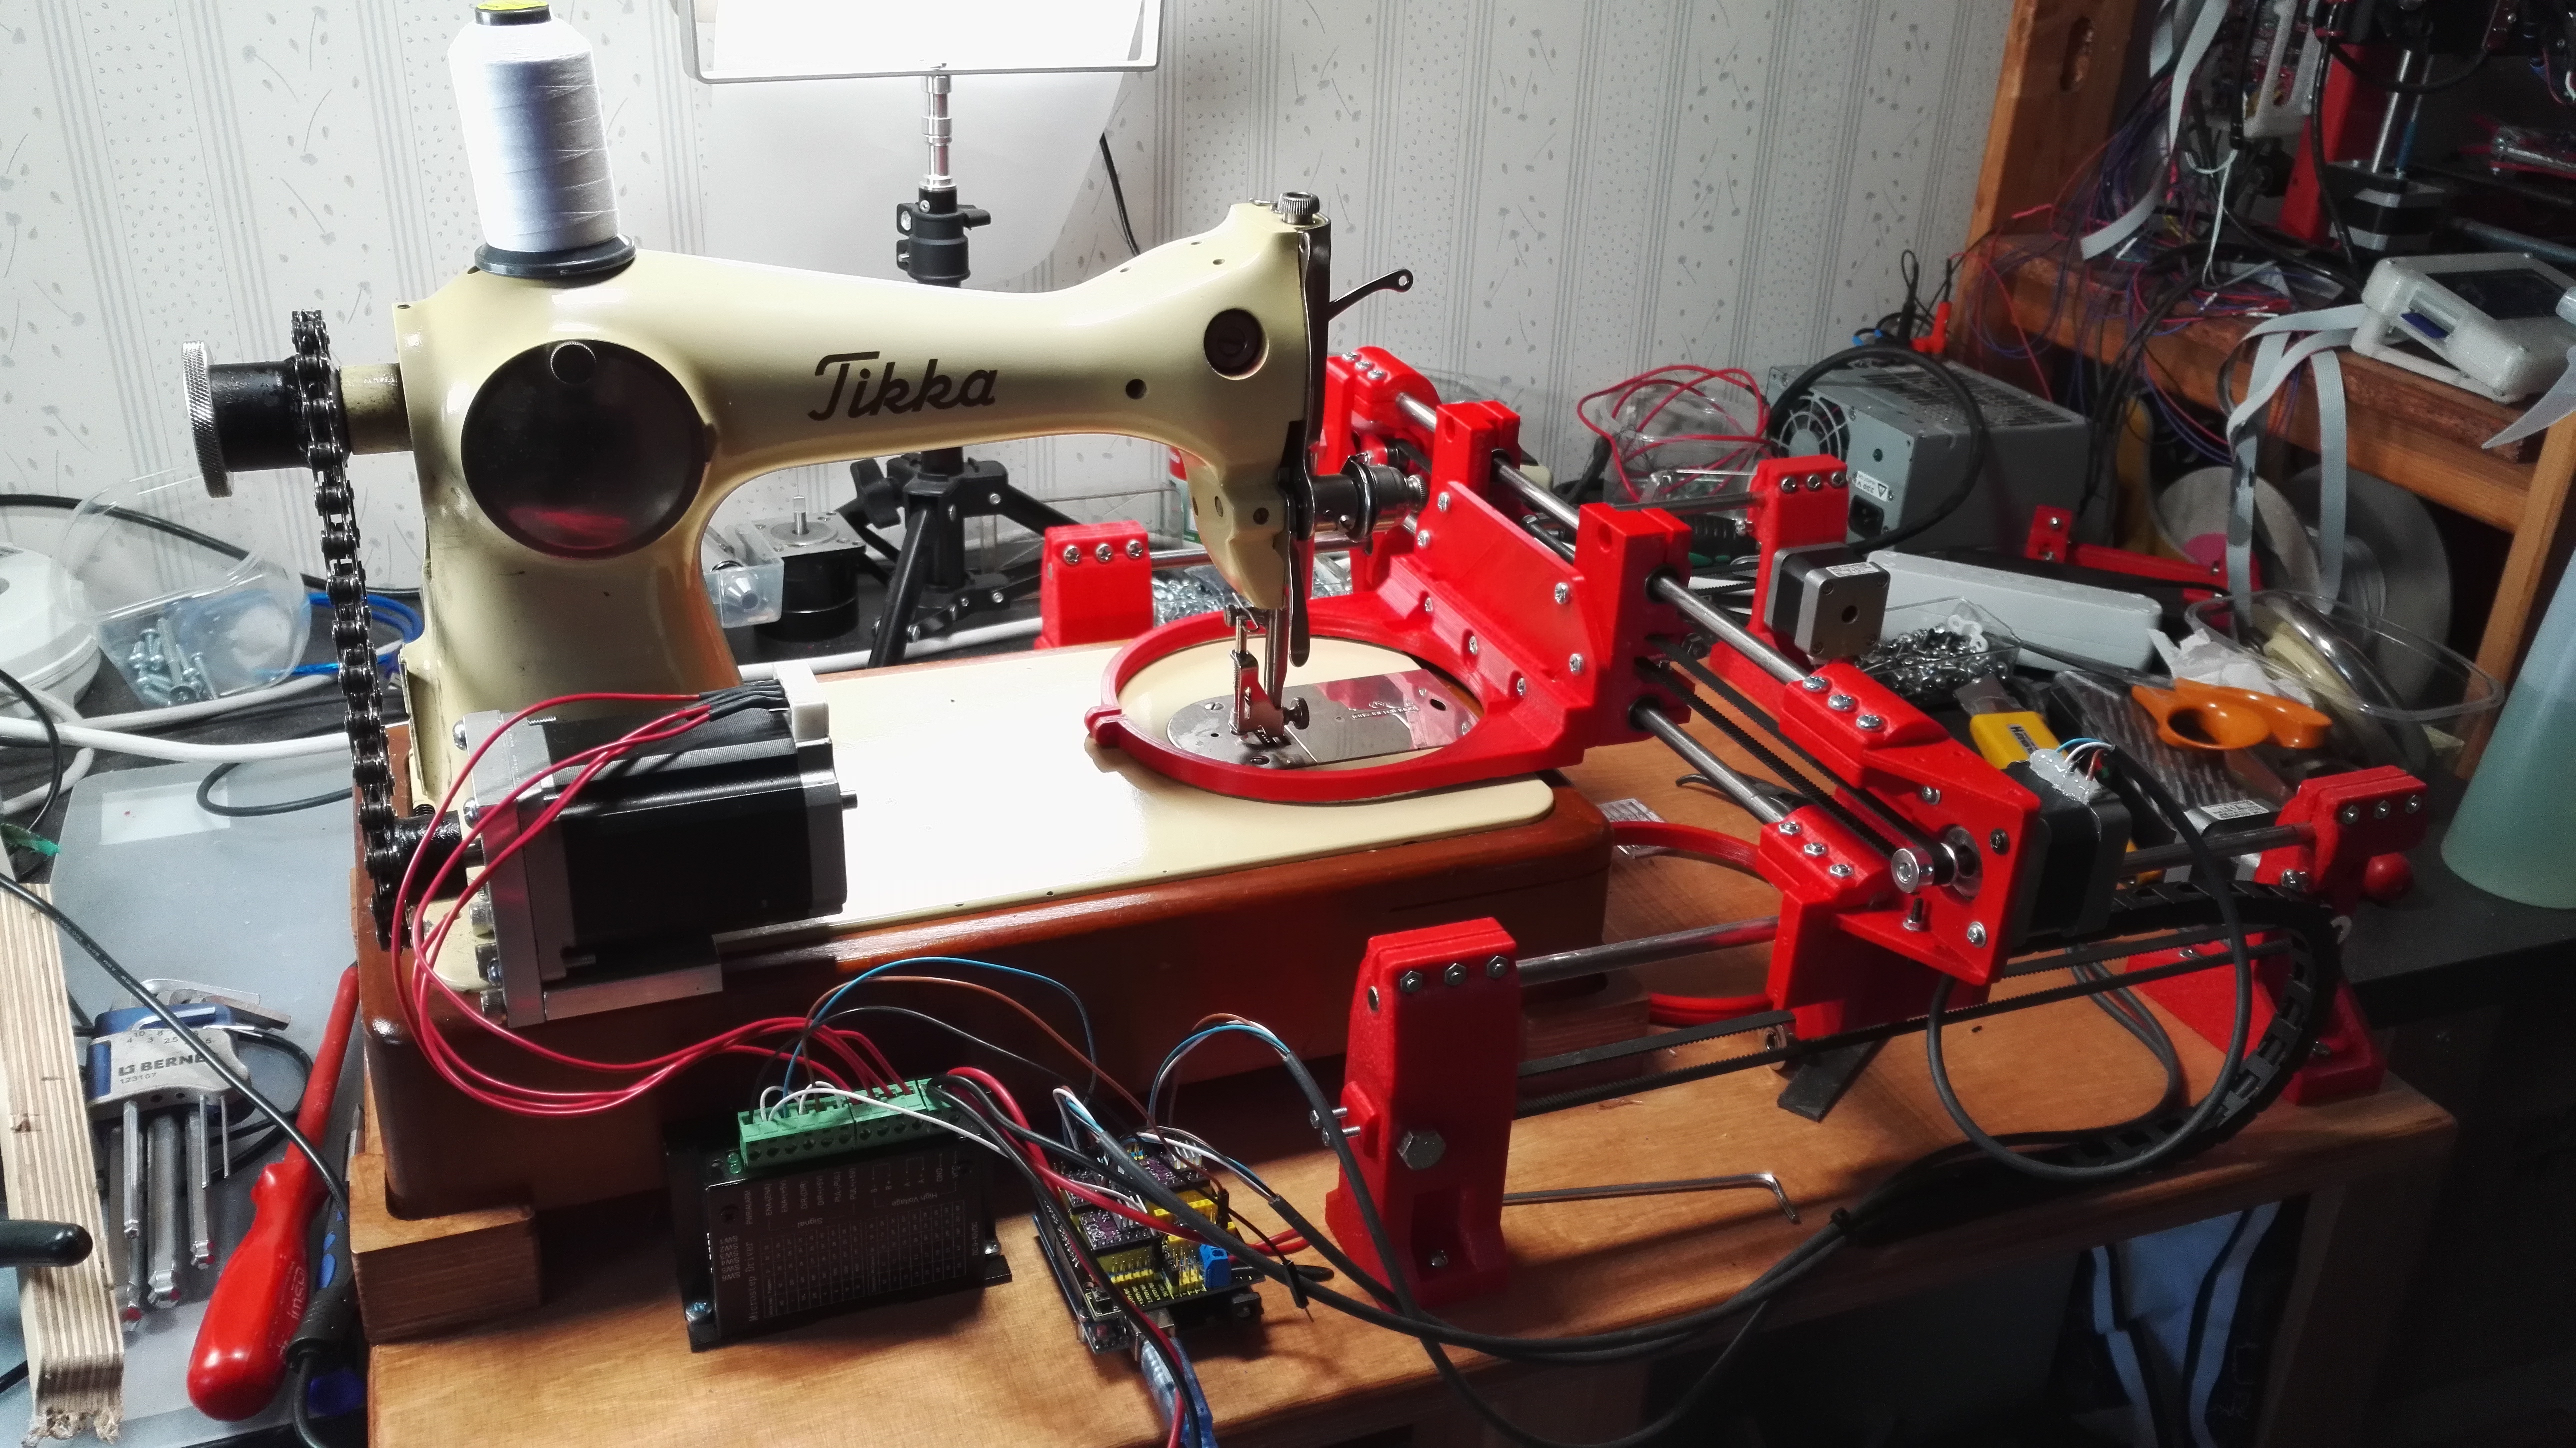
Sewing machine part is any old or new sewing machine. Only change for original is stepper motor with synchronised pulley system (chain/belt drive) and more embroidery friendly presser foot. It is recommended to use older sewing machine, way more convenient to mount stepper motor to cast iron and prises are relatively cheap.
XY movement consists mainly 3D printed parts, 12 pcs and similar parts known from self build 3D printers. Both axes use GT2 belts, nema17 steppers and both directions are fully scalable.
Synchronous movement comes from Arduino powered GRBL G-code interpreter, it is mouthful, but basically machine moves using G-code send to Arduino. It is not that complicated and it is only carrier like any other one when going from system to another one.
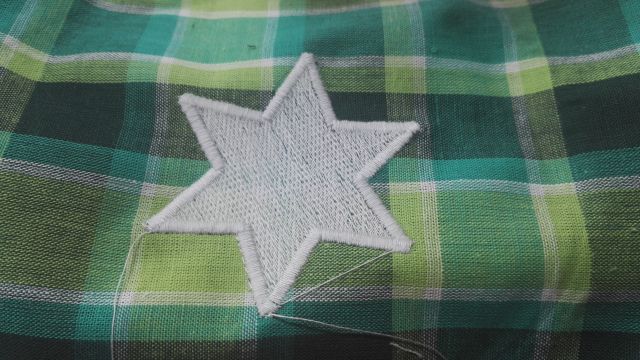
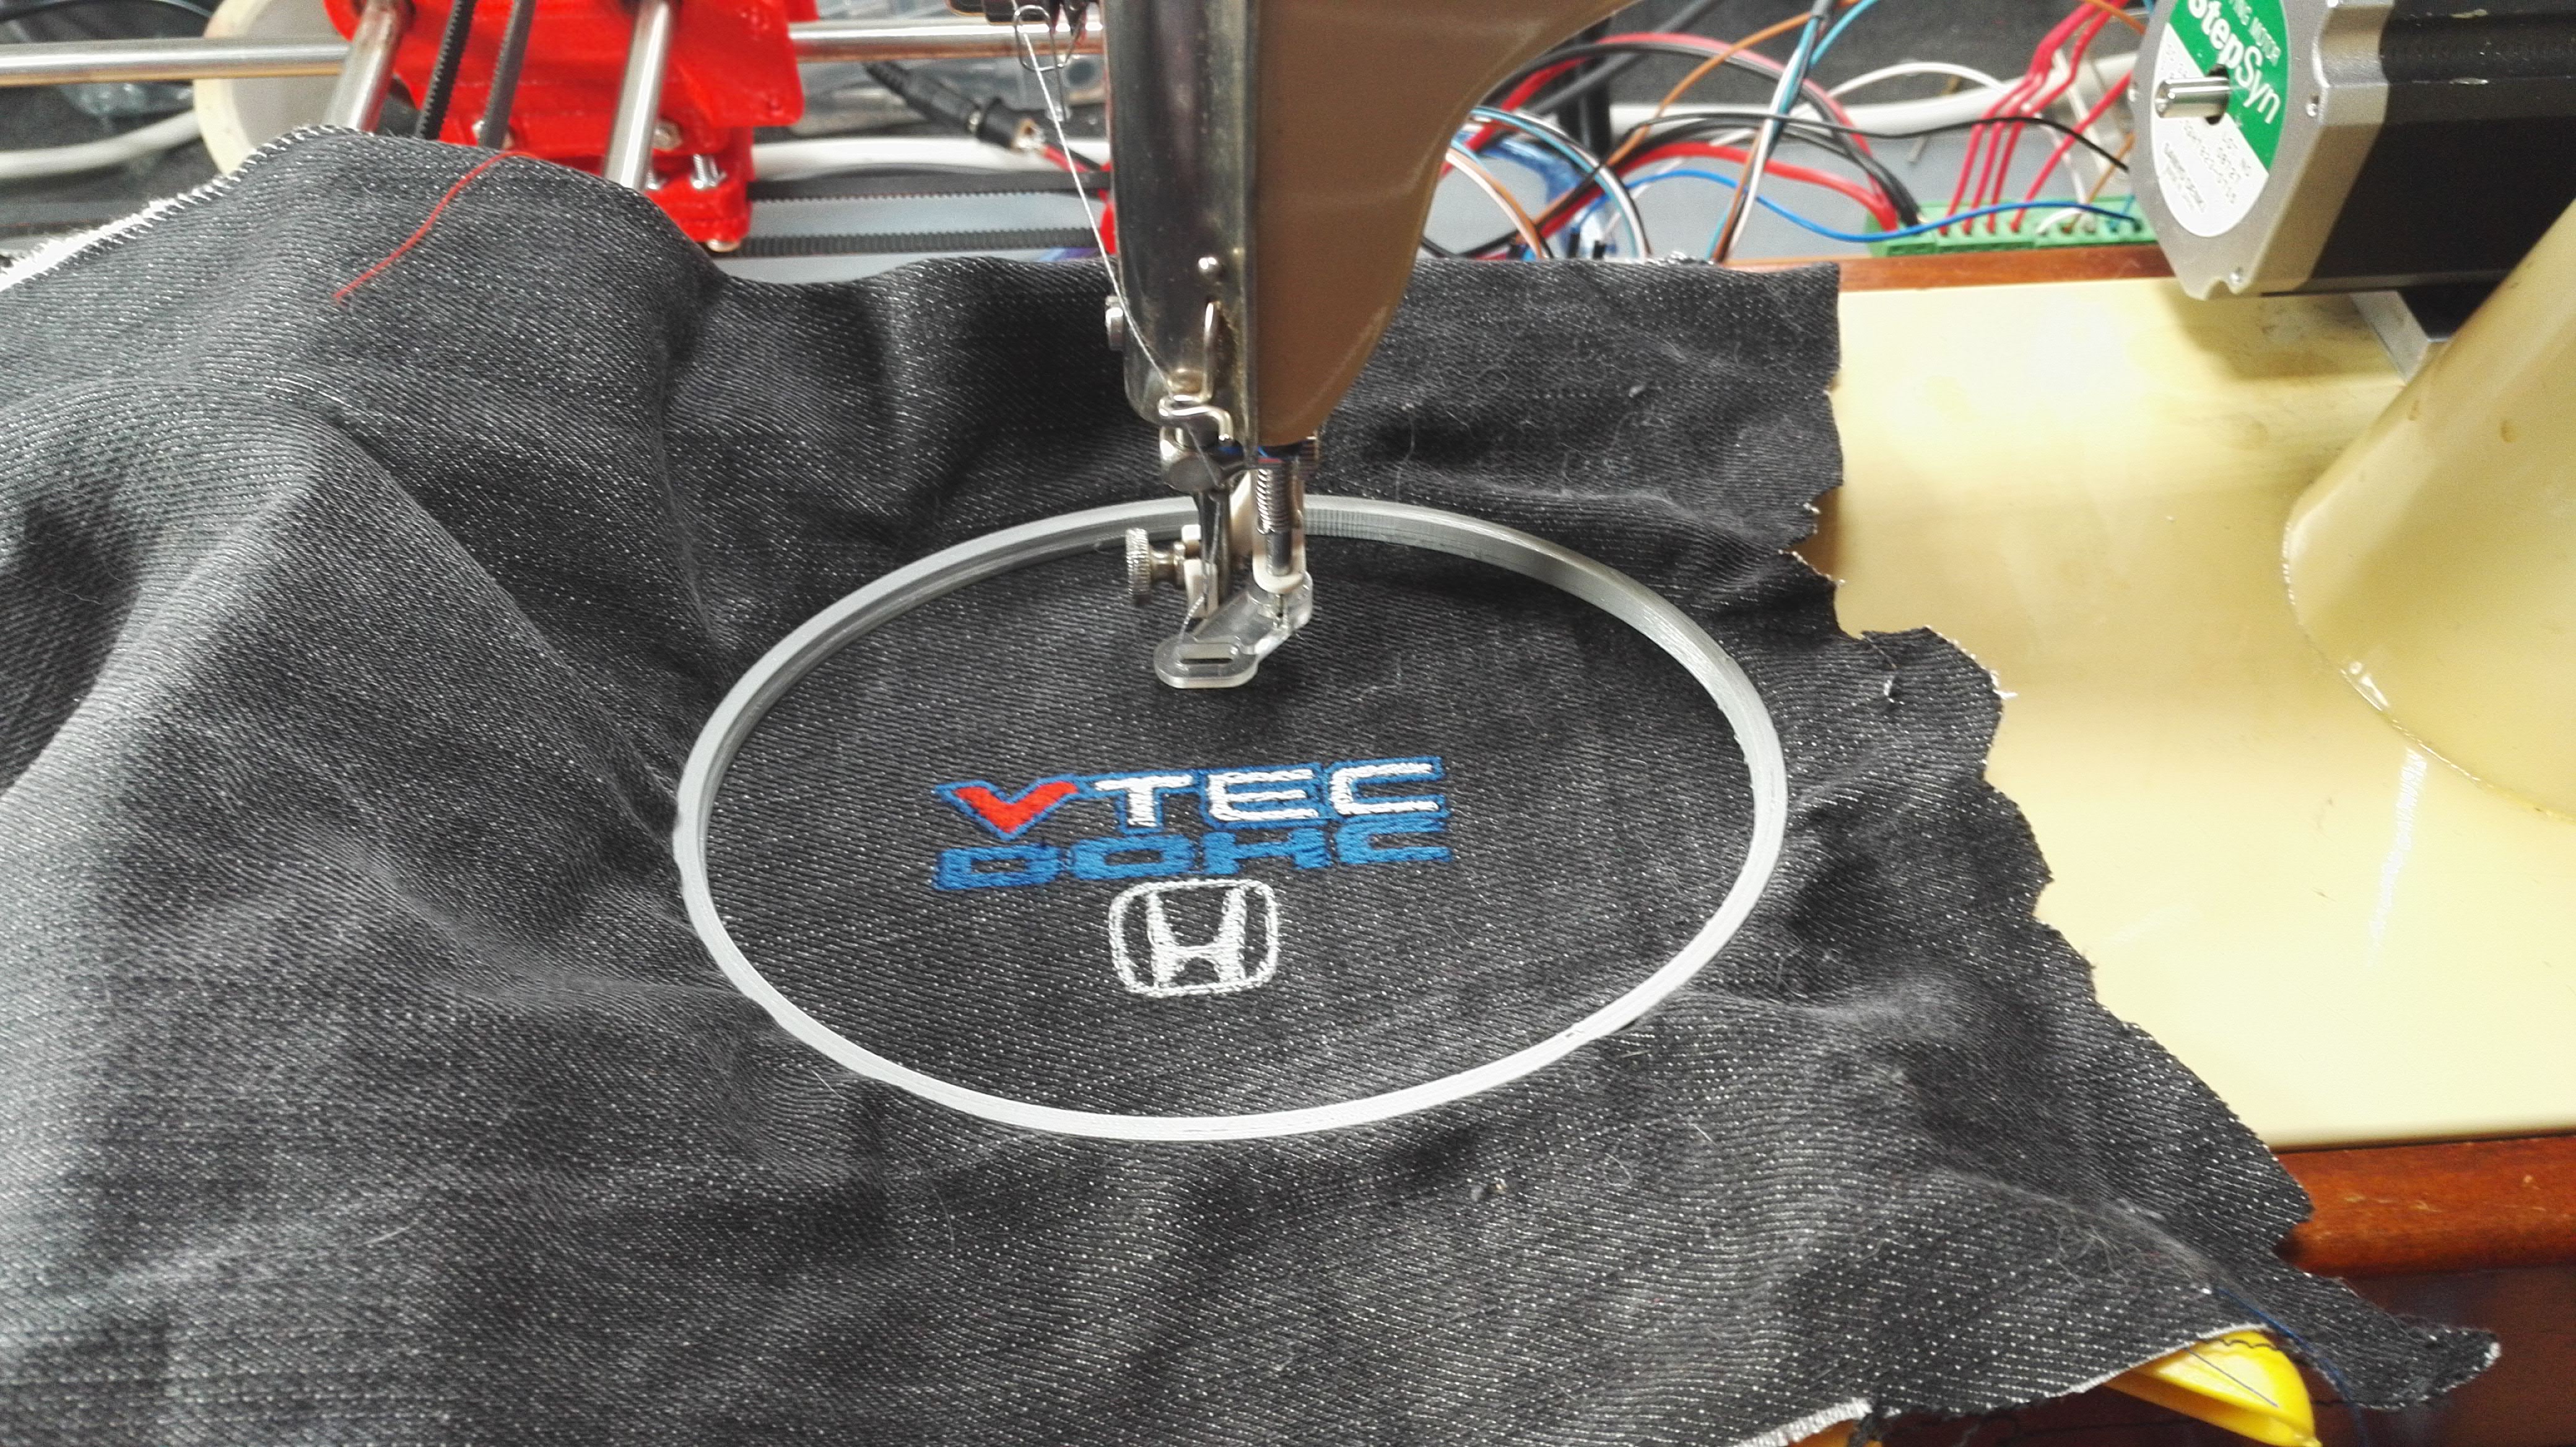
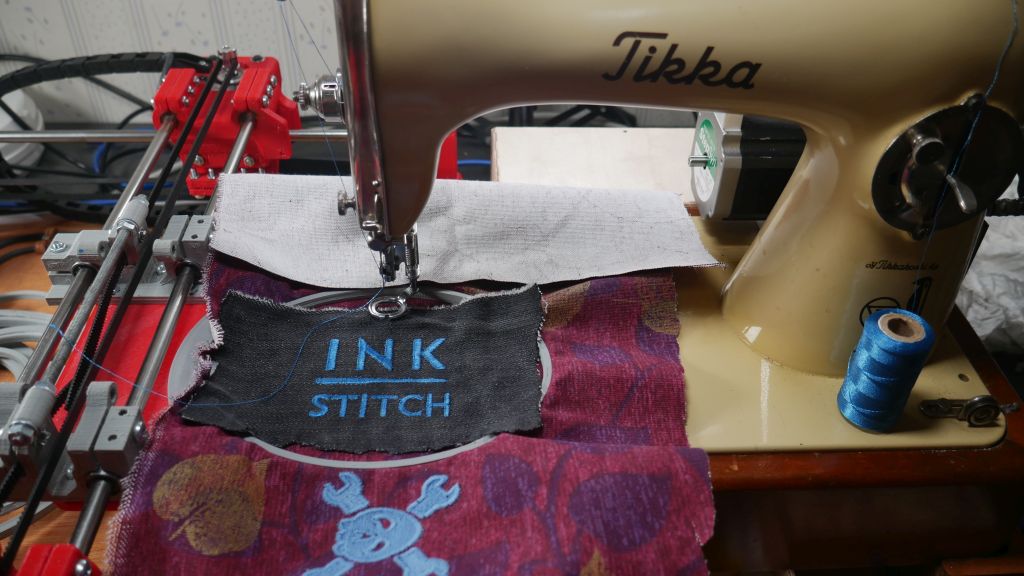
Now we have movement and code, but how to make nice shapes and export to G-code. It is nothing to do with medieval sorcery, it is a matter of downloading Inkscape and extension called Inkstitch
Help and examples how to use Inkstitch extension can be found address above. End result should be really close to hobby level embroidery machines, just slower speed. After all, embroidery machine is nothing more than overgrown sewing machine.


Build Instructions
Choosing suitable sewing machine

Basically anything will do, but it would suit much more better if it matched a few basic requirements:
- Simple straight stitch is only thing we need, so keep it simple.
- It must be domestic, no walking foot or anything that sort of “helping” movement, we don’t need that.
- Cast iron body, assures there is not any flex and wind wont fly it away. Fabric can become really tight when plenty of sewing is being made on single spot.
- Iron body makes it easier to swap more suitable stepping motor.
- With older sewing machine there is not that many parts to go wrong and old singer types are dirt cheap, if not, just find another.
- Before starting any modifications make sure sewing machine is fully working condition, use new thin needle and fabric and make long enough run. It is way easier to ditch than fix on this stage.
- If sewing machine needs some sort of uncommon needle, I recommend to get another one.
Pressing foot, you need one and specially designed to embroidery. If fabric rises with needle, entire stitch is lost, outcome is nothing that we like, this is of course a problem that my machine had. There are 4 types of pressing foots available nearly everywhere. I have tested these and only one is good, not actually, but it will do on start. Embroidery pressing foot is special because it rises every time when needle is up most location. Normal foot would drag fabric badly.
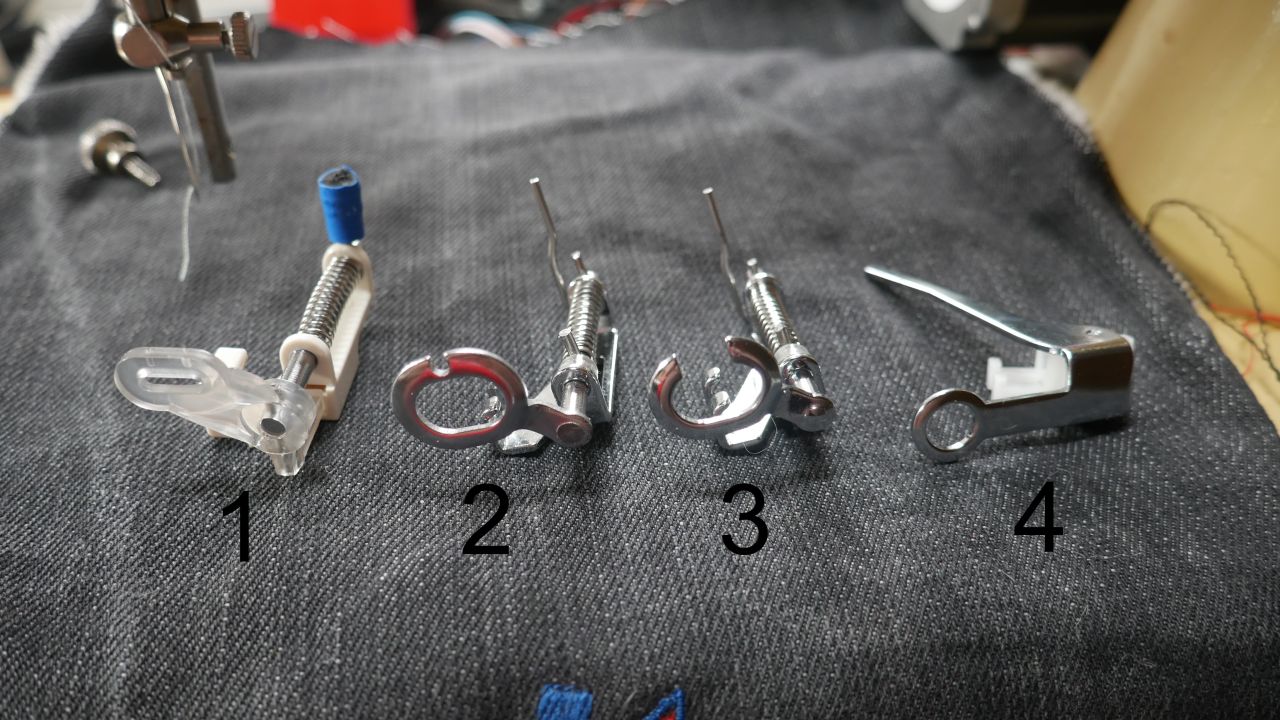
- This is best what comes to end result, but lack movement. Sliding hoop under this foot is tight fit. As seen on image above, lifting arm is stuffed with shrink wrap by me to maximise movement. It would make sense to have round hole for needle and thread. This is made for other methods, but it is still the best.
- Needle hole is way too big, this results as same as not having foot at all (nearly). Can be fixed with some plastic piece and tinkering. Movement arm can brake, lower stop pin is too long.
- Same as above, but worse, open loop can catch looping thread.
- Nothing to do with embroidery, movement is minimal and weak plastic spring. This might be the one that can be improved greatly in the future.
None of above are that good, but those are the options. I have ordered a few types more, but not yet any experience on those.
My sewing machine is branded as Tikka, but it is basically same as all the others on same era that being machines from1950, Singer 15-91 is exact match. Tikka is made at the same factory as famous Suomi KP/-31 (Suomi-konepistooli or “Finland-submachine gun”). Upper thread tension spring or complete housing might need attention. On My Tikka original spring is way too stiff, but a million and one spring assortment box will help on this. It is good to take it apart and clean anyway. Irregular thread tensioning will cause havoc.
Bobbins, just make sure you have enough of them and something to wind thread to them, because after modifications bobbing winder is not working any more. Commonly black or white thread is used on bobbins, but if thread tension is problem, same colour on both sides will help.
Thin oil or gun oil, make sure sewing machine is oiled well, but don’t over do it. One drop of oil every oiling location will do, if flooded wipe it away. Fabric, thread and dust will collect on excess oil and that is no good.
The build
Building embroidery machine is relative simple procedure, just download 3D models to print and buy few screws counted on BOM. This is really simple for those that have already build their own 3D printer, this is actually simpler and at the same time includes a lot of same parts.
Building instructions are mostly on 4 videos:
Part 1: Y sled assembly
Part 2: Y axis assembly
Part 3: X axis assembly
Part 4: Some GRBL basics to get starting
Videos should cover mostly everything mechanical, there is small BOM text, but it is not that complete. Important note would be to not over tight, there are plenty of screws to not have to over tight, because printed parts are fragile!
Assemble first everything finger tight and after everything is mounted on plywood and still everything moves freely, start tightening gently. After everything is tight enough, do not over do it, both axes should move easily. This helps machine movements and endures longer lifetime. I have noted when doing assemblies like Y axis, it might be tight at first, but after 24 hours or so plastic gives up some, so if Y axis is tight, wait a few hours. If this doesn’t help, then it is time to do something. I did a dramatic thing and heated up Y slide to make it perfect, it was because of poor printing, but it can be fixed. After everything is right, it is time to add GT2 belts and make them tight. I have to say again, do not over do it. Not included this on my videos, but it should be straight forward to do.
Connecting Stepper driver TB6600 to GRBL shield. +5V and GND can be taken from shield.


GRBL
Everything you should know https://github.com/gnea/grbl/wiki
First step is compile GRBL to arduino
https://github.com/gnea/grbl/wiki/Flashing-Grbl-to-an-Arduino
https://github.com/gnea/grbl/wiki/Compiling-Grbl
This looks more complicated than it really is.
After compiling GRBL, you need something to control Arduino, my recommendation is GRBL panel, but there are many others. I feel this is the most user-friendly with minimal extensions to confuse you.
https://github.com/Gerritv/Grbl-Panel/wiki

Connect to Arduino/GRBL and go to settings tab.

Something similar should be visible on left hand side.
GRBL wiki will explain every function, you can change every value.
Important changes are:
-
$20 and $21 change to FALSE, this will allow machine to move without home location.
-
$100 and $101 XY step/mm 16 teeth GT2 belt gear
-
$102 this is sewing machine increment, number must be calculated for different stepper motors and gearings. Overall full rotation distance must be between 2 and 10.
-
$110 and $111 Max feed, can be adjusted, this is very safe speed to start.
-
$112 Z max feed, must be test separately.
-
$120 and $130 XY acceleration, very average speed.
-
$130 Z acceleration, must be test what works.
These are only ones that are important, recommend to read setups for $0-$4 just in case some of those help for movement directions.
BOM for this embroidery contraption
| Item | Length | PCS | note |
|---|---|---|---|
| Sewing machine | 1 | Fully working one will do | |
| Nema 17 stepper | 3 | Anything that suits 3D printers or similar applications | |
| Nema 23 stepper | 1 | This drives sewing, bigger is better | |
| Stepper driver TB6600 | 1 | Or similar to suit sewing machine stepper | |
| Arduino uno | 1 | ||
| GRBL shield for uno | 1 | Make sure it is equipped with 4 stepper driver places | |
| DRV8825 | 3 | Stepper drivers for nema 17 steppers | |
| Jumpers | 9 | For micro stepping configuration | |
| Jumper wires | x | Connecting sewing machine stepper driver and controls | |
| Connecting wires | x | Connecting everything else | |
| 8mm linear slide | 400mm | 4 | Stainless rods or better |
| LM8UU | 8 | 8mm linear bearings | |
| 624ZZ bearings | 6 | Tightening bearings for belt | |
| 8mm GT2 belt | 3M | Or 3x 800mm | |
| GT2 pulley 16 Teeth | 3 | Suitable for nema17 steppers | |
| Mounting for big stepper | 1 | Depends on what was used | |
| Gear and belt for machine | Timing belt or chain, to keep machine on sync. | ||
| M4 screws | 20mm | 60 | Some are extra |
| M3 screws for steppers | 12mm | 12 | Might wary on steppers used |
| M3 screws | 20mm | 6 | Belt tightening |
| M8 screws | 40mm | 3 | Belt tightening |
| M4 nuts | 60 | Some are extra | |
| M3 nuts | 6 | Belt tightening | |
| M8 nuts | 2 | Belt tightening | |
| M5 thread rod | 160mm | 1 | Adjusting for Y axes |
| M5 nuts | 4 | Adjusting for Y axes | |
| M4 wing nuts | 2 | Hoop quick connect | |
| 3D printed parts | |||
| EXTRA | |||
| Momentary buttons | 3 | Control box (reset/hold/resume) | |
| On/on lever switch | 2 | Control box (auto/manual motor control) | |
| Plywood or similar | 450X700 thickness 21mm~ |
Special note for driving stepper: not having plans for attaching sewing machine stepper or drive pulley system. I have used Sanyo Denki Stepping Motor Step Syn 103H7823-0715 DC3A 1.8/STEP can’t find suitable documentation for it.
But I can say much more bigger is needed, currently stepper is geared down 3:1 to keep it working constantly. When something goes horribly wrong it will stall, actually this is good thing. Eventually I will update motor or double the voltage. Sprocket I have used are self made from another project, so dimensions from them will not help anybody else. I would greatly recommend driving stepper with closed loop operation. If stalled, it will recover and should be possible to drive faster and reliable.
Locations of 3D printed parts

Discussion
Read the details on GitHub.