From image to Cross Stitch
This feature will be part of an upcoming Ink/Stitch release. It is not yet integrated in Ink/Stitch.
The cross stitch assistant helps you transform an image into Cross Stitch fills.
The results of this tutorial different steps can be found in this file:

Starting Image
The process will be simpler and more efficient if the image is simple, with few colors and clearly defined color areas. The simplier the original image, the less you will have to work to tweat the assistant results.
The starting image (top left above) is by Pawpedia on Pixabay, licensed by Pixabay, which allows the creation of derivative works.
You need to decide:
- the desired size for the embroidery (180 mm in the example), and then reduce the image to this size
- the size of the cross stitches (2 mm in the example)
Using the Cross Stitch Assistant to generate Cross Stitch Fills
Select the image and go to Ink/Stitch > Tools: Fill > Cross Stitch Hetter
-
In the Parameters tab:
-
Restore the default values
-
Choose the horizontal grid spacing
-
-
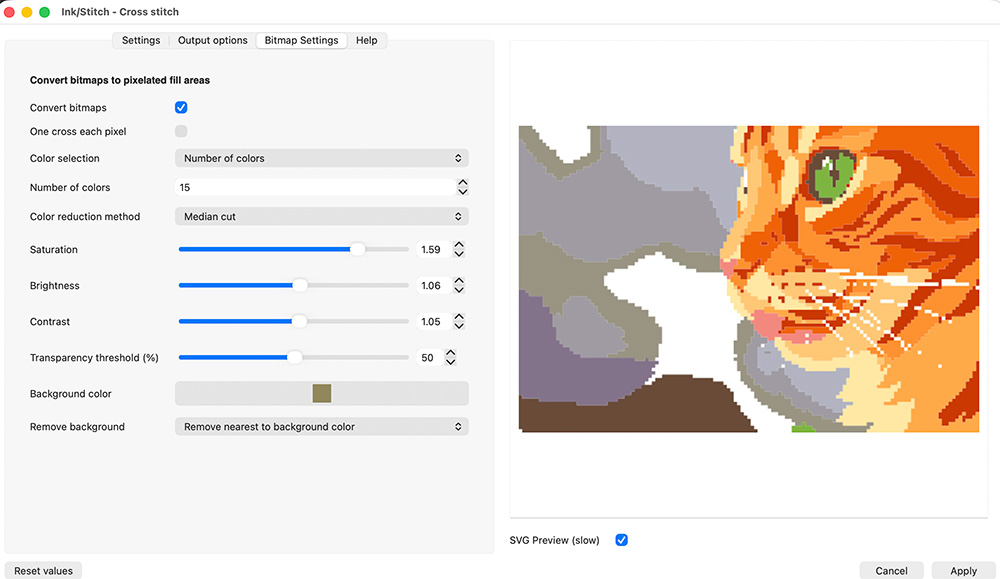
Then, in the Bitmap Image Settings tab, experiment with the various parameters to achieve a satisfactory result.
To make the areas more easily recognizable, I significantly increased the saturation, thereby altering the original colors.
If your computer supports it, checking the SVG Preview box is helpful, but simply previewing the image allows you to choose the settings.
In this example, it wasn’t possible to completely remove the multicolored background.
Note that the number of colors includes the background color, whether it’s removed or not. This number of colors is also a maximum, not a value that Ink/Stitch will always reach.
The result (the “first result” layer) is a starting point that can be improved.
Improving Shapes and Embroidery
-
Remove the unwanted background parts.
-
Add whiskers and other hairs. The white hairs in the original image are not large enough for the cross stitch assistant do keep them. Simply redraw them on top of the cross stitch shapes, without worrying about creating a pixelated shape. So, using the Bézier curve tool, I drew white lines where I wanted hairs, gave these lines a thickness of 3 mm, and converted their outlines to paths (Inkscape > Path > Outline to Path) to obtain narrow areas.
I then select the wholecross stitch group plus the added hairs, and relaunch the cross stitch assitant.
Re-using the cross-stitch assistant (with the pixelate and remove overlays options checked) allows you to recalculate new pixelated shapes, making it easy to see your progress.
During the improvement process, you may need to use the assistant several times.
With such a starting image, it’s inevitable to end up with many very small areas (with only one or two cross stitches) and many disconnected shapes, resulting in a lot of jumps or thread trims.
-
For the very small areas, I like to change their color to match an adjacent area: to do this, select the small area, then select the eyedropper tool and click in an adjacent area.
-
I try to merge areas of the same color that are almost adjacent. Note that two areas of the same color only need to touch at a corner to be merged. This can be done either by distorting existing shapes or simply by drawing something connecting them on top the cross stitch fills.
After achieving a visually pleasing result, remember to select everything and re-use the cross stitch assistant so that adjacent areas of the same color are merged.
You need to find a balance between preserving the original image and simplifying the embroidery.
The result can be found in the “tweaking the shapes” layer.
Choosing final embroidery colors
You can, if you wish, choose colors closer to those of the original image, while limiting yourself to the colors in your preferred thread palette.
The final result is in the “changing_colors” layer.