Color Blending
Automatic fills don’t have to be flat, gradient fills are welcome!
Linear Gradient Fill
Generating color gradients with Ink/Stitch has become easy. The best quality can be achieved with the linear gradient fill stitch type, which aims to produce a flawless fill in terms of row and stitch positions despite the color changes.
- Create a shape with an inkscape gradient fill
- In the params dialog choose “Linear Gradient Fill” as the fill method
Convert to Gradient Block extension
Ink/Stitch has a tool to split color gradient fills into separate blocks. It doesn’t deliver the same quality result as the usage of the linear gradient fill, but can be used for more experimental purposes. The convert to gradient blocks extension
- Create a shape with an inkscape gradient fill
- Choose the automatic fill method and choose the rest of the parameters.
- Select the shape
Extensions > Ink/Stitch > Tools : fill > Convert to gradient blocks


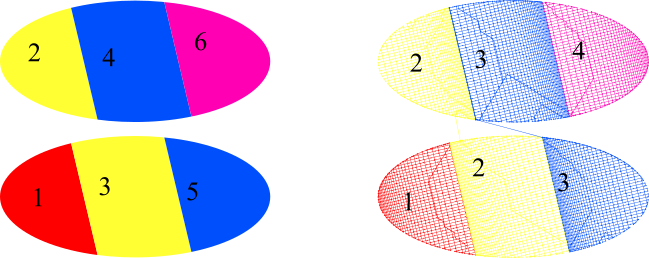
If n+1 colors are used, the extension splits the shape into n parts and stack two gradient blocs over each part.
This will yield n+1 colorblocs in the final embroidery.
The 2n gradient blocs all have varying row spacing: looking at the two stacked gradients blocs on a given part, one color row spacing increases while the other color row spacing decreases, yielding a gradient fill.
The gradient direction dictates the fill angle.
How is varying row spacing achieved ?
Setting End row spacing parameter allows for a varying row spacing fill. Looking perpendicularly to the fill angle, the row spacing starts at spacing between rows value and ends up at end row spacing value, varying linearly in between.
The two gradient blocks the Convert to gradient blocks stacks on each subshape have same spacing between rows and end row spacing but opposite fill angles, therefore achieving the gradient effect. The actual values of these parameters depends on the initial parameters of the shape, aiming to respect the overall row spacing.
Tweaking the result
Using the extension instead of manually creating the subshapes and the gradient blocks is a huge time saver. You may carefully change the values of spacing between rows and end row spacing to achieve a different blending effect, but be aware of possible density issue, as you are filling each subshape twice.
Remember that density is the inverse of spacing between rows. If you aim to a given overall spacing between rows sbr (both colors included), then the sum of the inverse of the spacing between rows of the two gradient blocs must be equal to 1/sbr, as well as the sum of the inverse of their end row spacing.
These is part of a file containing 100 rectangles each covered by a red varying spacing fill and a blue varying spacing fill, for different values of the parameters

Manual blending
If you wish to go the manual way and have total control
Faux Fill Blend
- A faux blend has a regular fill layer on bottom and each subsequent layer has variable density settings
- Make sure that all of the layers have the same stitch angle, this allows for blending to happen
- When doing more than 2 layers, each blending layer uses less density then the previous layer
- Make sure to follow the same start and end points for each layer. For instance, if the base layer starts at top left and ends at bottom right, follow that same sequence for each layer.
- Underlay is typically not needed, but it does depend on the individual project.
- Typically, it is best to work from light to dark colors, but again it does depend on the design and the desired end look.
- While this is not a true blend, in most instances, this type of blend is good enough to achieve the desired end look.
- The density values in this example are not set in stone, but just to illustrate the concept. True settings will depend on the design, fabric it’s going on and the size of design.
True Blend
- Many of the conditions of faux blends also apply here. Stitch angle, start/end sequencing, typically go from light to dark colors (depends on the design as well)
- Biggest difference is math is involved and the more complicated the blend, the more complicated the math. Just have to make sure that each layer for a given section equals 100% of the density for that section that you are wanting.
- This can involve more layers of colors and more increments of density variation. The biggest factor is the size/shape of the design and the specifics of the project.
- What makes this a true blend compared to a faux blend is that each section of the layers are actually mixing with each other.