⚠ This page is outdated. For more recent information have a look at the english original.
Stichpfad-Optimierung
Den Stickpfad zu optimieren ist eine der wichtigsten Aufgaben beim Erstellen einer Stickdatei. Lerne hier, wie Ink/Stitch dir bei dieser Aufgabe helfen kann.
Beim Drucken spielt die Reihenfolge und die Verbindung der Elemente untereinander keine Rolle. Beim Sticken aber sollte man unbedingt darauf achten dass:
-
die Elemente in logischer Reihenfolge aufgebaut sind
-
Vermeide Farbwechsel so gut wie möglich
Es kann aber manchmal nötig sein, zusätzliche Farbwechsel zu nutzen, nämlich dann, wenn die Farben mal unterhalb, mal oberhalb anderer Elemente gestickt werden müssen oder wenn der Verzug am Stoff andernfalls für die folgenden Elemente zu groß werden würde.
- Registrierungsprobleme verhinden
- Knittern im Stoff verhindern
-
-
Sprungstiche vermieden werden
In der gesamten Stickdatei sollten keine unnätigen Sprungstiche vorhanden sein. Versuche nicht, sie durch Fadenschnittbefehle zu verstecken, sondern versuche lieber duch geschickte Unterpfade eine bessere Lösung zu finden. Fadenschnitte verursachen Chaos auf der Rückseite der Stickerei und verlangsamt die Maschine beim Stickvorgang stark.
Jede Datei ist individuell und du bist der Designer der entscheiden kann wie die Stickpfade aufgebaut sind. Aber Ink/Stitch hält ein paar Werkzeuge bereit, die dich unterstützen können.
Generelle Pfadoptimierung
Objekte in Auswahlreihenfolge sortieren
Elemente im Ebenen und Objekte Dialog hoch und runter zu bewegen kann ermüdend sein. Dafür gibt es einen schnelleren Weg: wähle die Elemente in der gewünschten Stickreihenfolge aus und nutze die Ink/Stitch Erweiterung Objekte in Auswahlreiehenfolge sortieren.
Sprungstich zu Geradstich
Wenn alle Stickelemente gut vorbereitet sind. Alle in die richtige Reihenfolge gebracht worden sind und die Start- und Endpunkte festliegen, kann die Funktion Sprungstich zu Geradstich die letzten Sprungstiche beseitigen. Sie fügt Geradstiche an den Stellen ein, an denen ein Sprungstich gesetzt werden würde. Ändere den Pfad der neuen Geradstich-Pfade, um die Sprungstiche unter nachfolgenden Stickobjekten zu verstecken.
Gibt es einen kurzen Abstand ohne die Möglichkeit den Geradstich zu verdecken, nutze die Verbindung um kleine Zwischenstiche zu setzen, die beim Sticken in den Stoff einsinken werden.
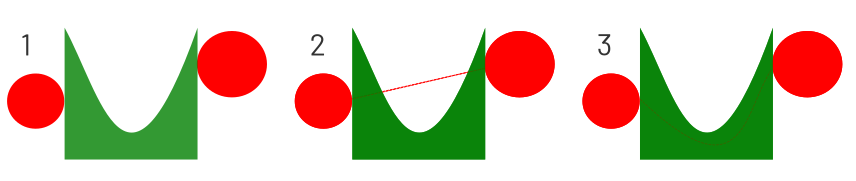
1: Original 2: Sprungstich zu Geradstich 3: Der manuell angepasste Geradstich-Pfad verläuft unter der nachfolgenden Füllung
Pfadoptimierung für linienartige Sticharten
Linienartige Sticharten starten am Anfang des Pfades und laufen am Pfad entlang. Geschlossene Pfade sollten geöffnet werden um Anfang und Ende klar zu definieren.
Pfadrichtung sichtbar machen
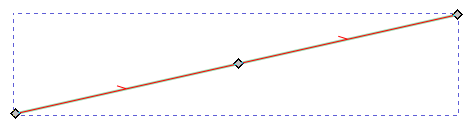
Im Personaliserungs-Artikel wird beschrieben, wie in Inkscape die Pfadrichtungen sichtbar gemacht werden können. So kannst du direkt überprüfen wo der Pfad anfängt und wo er endet.
Stickrichtung anpassen
Nun hast du bereits sichergestellt, dass die Pfadrichtungen sichtbar sind. Zeigt der Pfad in die falsche Richtung, kann er markiert werden und mit Pfad > Richtung umkehren umgedreht werden. Dies ist bei der Erstellung von Stickdateien eine häufig genutzte Funktion. Daher empfehlen wir hierfür ein Tastenkürzel zu setzen. Im Personalisierungs-Artikel erklkären wir, wie das geht.
Parameter: Wiederholungen anpassen
Soll die Stickerei am gleichen Punkt der Linie enden wo sie gestartet ist, gibt es mehrere Optionen dies zu erreichen. Im Parameterdialog kann die Anzahl der Wiederholungen auf eine gerade Zahl gesetzt werden. Dies empfiehlt sich jedoch nicht, wenn beispielsweise ein Mehrfachgeradstich genutzt wurde. In diesem Fall sollte der Pfad dupliziert und in umgekehrter Richtung als einfacher Geradstich ausgestickt werden.
Automatisch geführter Geradstich / Redwork
Nutzt das Design eine große Anzahl an Linien, kann es sehr aarbeitsaufwändig sein, diese manuell in einen optimalen möglichst zusammenhängenden Pfad umzuwandeln.
Ink/Stith stellt für diesen Zweck zwei Werkzeuge zur Verfügung. Redwork ist in den meisten Fällen zu bevorzugen, da es einen gleichmäßigen Pfad erzeugt, bei dem jede Linie genau zwei mal durchlaufen wird. Es ist möglich ein Startposition festzulegen. Redwork wird immer an der gleichen Stelle starten und enden. Ist das nicht gewünscht, ist vielleicht das Werkzeug Automatisch geführter Geradstich die richtige Wahl.
Optionen für Satin Routing
Ink/Stitch erlaubt geschlossene Pfade für Satinsäulen. Um Probleme zu vermeiden, empfiehlt es sich aber, die Pfade als offene Pfade anzulegen.
Start- und Endpunkt
Standardmäßig startet eine Satinsäule am nächstgelegenen Punkt zum vorherigen Element und endet zum nächstgelegenen Punkt des folgenden Elements. Werden die Optionen Automatischer Startpunkt und Automatischer Endpunkt deaktiviert, verläuft die Stickrichtung in der Richtung der Konturpfade. Manuelles Setzen von Anfangs- und Endpunkten ist ebenfalls möglich.
Automatisch geführte Satinsäulen
Genauso wie für die einfachen Linien, gibt es auch für Satinsäulen ein Werkzeug zur automatischen Pfadoptimierung: Automatisch geführte Satinsäulen.
Ist die Option Behalte Reihenfolge der Satinsäulen bei aktiviert, wird Ink/Stitch versuchen die Satinsäulen so gut es geht zu optimieren, allerdings werden hier keine Geradstiche erzeugt, die die Säulen verdeckt verbinden. Ist die Option deaktiviert, kann die Reihenfolge nicht kontrolliert werden.
Die beste Option ist derzeit die Reihenfolge der Säulen sorgfältig vorzubereiten. Dabei kann die oben genannte Erweiterung zum Sortieren der Element hilfreich sein. Anschließend kann die Erweiterung “Automatisch geführte Satinsäulen” ausgeführt werden. Wähle alle Säulen an und führe die Funktion Sprungstich zu Geradstich aus. Passe die so eingefügten Geradstiche so an, dass sie unter den oben gestickten Satinsäulen liegen.
Satinsäulen schneiden
Wenn ein Satinsäule manuell geteilt wird, beispielsweise für einen optimierten Stichpfad, gehen alle Parametereinstellungen verloren. Daher empfehlen wir die Ink/Stitch Erweiterung Satinsäule schneiden zu verwenden. So können die Parametereinstellungen erhalten bleiben.
Parameter: Seiten umkehren
Über den Parameterdialog können die Seiten der Satinsäule vertauscht werden. Dies bedeutet, dass die Säule auf der anderen Seite als zuvor beginnen wird. Bitte beachte dabei, dass alle Einstellungen die sich auf eine Seite beziehen dabei ebenfalls gedreht werden und ggf. angepasst werden müssen.
Parameter: Konturlinien umkehren
Im Parameterdialog kann die gesammte Stickrichtung angepasst werden.
Parameter: Wiederholungen für Mittellinien und Unterlagen anpassen
Wird im Parameterdialog die Anzahl der Wiederholungen der Mittellinien-Unterlage auf einen ungerade Wert gesetzt, wird die Satinsäule an der gleichen Seite starten und enden. Dies kann hilfreich sein, um das manuelle digitalisieren von Geradtsichen unter der Stainsäule zu vermeiden.
Routing Optionen für Füllstiche
Ink/Stitch erlaubt offene Pfade für Füllungen. Um Probleme zu vermeiden, empfiehlt es sich aber, die Pfade als geschlossene Pfade anzulegen.
Start- und Endbefehle
Standardmäßig starten Füllstiche am nächstgelegenen Punkt zum vorangegangen Element und endet am nächsten Punkt zum folgenden Element. Dieses Verhalten kann durch manuelles Setzen von Anfangs- und Endpunkten überschrieben werden.
Werden viele dieser Befehle eingesetzt, kann es auf der Arbeitsfläche etwas unübersichtlich werden. So kann es hilfreich sein zu wissen, dass die Befehle auch dann weiterhin funktionieren, wenn sie unsichtbar sind.