Troubleshooting in Ink/Stitch
Don’t be afraid to report a bug or annoying program behavior. Developers rely on your reports and appreciate any feedback.
Identify element
If an error occurs, it is important to locate the problematic element. The stitch plan preview can be used for this. With a keyboard shortcut smaller groups or individual elements can be rendered quickly until the defective element has been identified.
Problem solving
- If Ink/Stitch states that there is an error in the program, you have the unique opportunity to help improve Ink/Stitch and get in touch with the friendly developers. Unfortunately, the Ink/Stitch standard tools usually do little to help solve the problem.
- All other errors can be easily dealt with using the onboard tools.
Error in the program (Traceback)
- Save the file
- If the problematic element has already been identified, you can start looking for solutions
- Delete/change parameters
- Change the start/end point
- Change the shape (e.g. avoid narrow areas in fill stitches)
- Try whatever else comes to your mind
- Copy the last line of the error message and search for it on GitHub: https://github.com/inkstitch/inkstitch
- If the error has not yet been reported on GitHub, be sure to send an error report to the developers and attach the problematic SVG file (https://github.com/inkstitch/inkstitch/issues).
Ink/Stitch troubleshooting tools
Troubleshoot objects
Extensions > Ink/Stitch > Troubleshoot > Troubleshoot objects
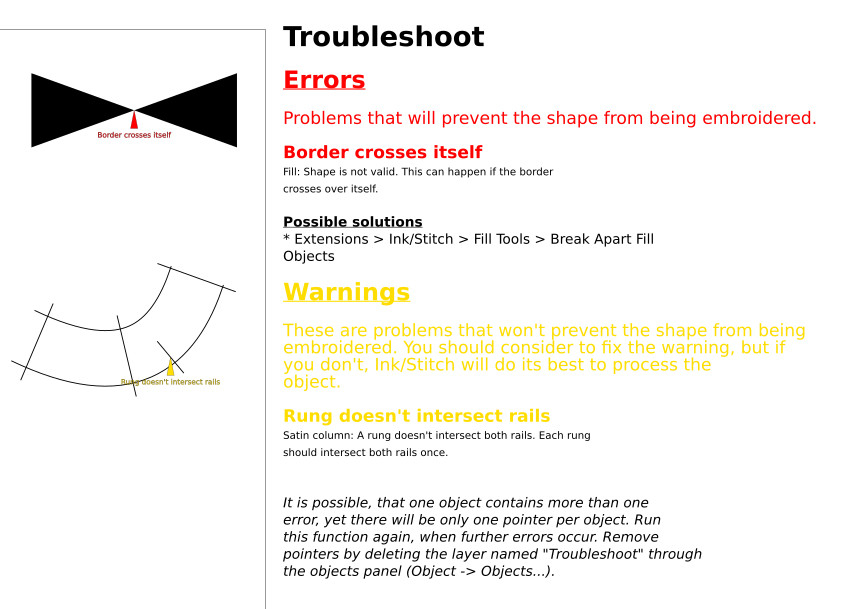 Error messages with suggested solutions
Troubleshoot objects indicates errors (red) and shows warnings for potentially problematic paths (yellow).
Suggestions for solutions are given which should usually lead to a functioning file.
The errors and warnings shown in the image are now outdated or revised. Fortunately, crossing borders is no longer such a big problem. Instead, a warning is issued for this, because the embroidery paths can still be optimized better if the element has been broken down manually (exceptions prove the rule: see color change reduction for tartan patterns or color transitions).
It is therefore worth using this function - even if no error has occurred.
Cleanup document
Extensions > Ink/Stitch > Troubleshoot > Cleanup Document...
Common causes of errors are elements in the document that are too small, which either do not produce good results or actually lead to error messages.
They can be removed quite easily with this tool. Empty layers and groups can also be removed with a swipe. If you are unsure which values should be entered here, you can also start a test run and look at the names and number of elements to be removed beforehand or get a preview using the Live Preview (with the test run deactivated).
Element Info
Extensions > Ink/Stitch > Troubleshoot > Element info
A tool for the embroidery analysts among you. This allows to easily access accurate measurements and stitches information.
This is still a pretty simple list. If you are missing certain information, please feel free to express your wishes on GitHub.
Break apart fill objects
Extensions > Ink/Stitch > Tools: Fill > Break apart fill objects...
Anyone who has been using Ink/Stitch for several years will know that crossing borders were a nuisance. This situation gave rise to this tool, which has fortunately lost its importance. Despite the improved situation for desperate Ink/Stitch users, it has not completely lost its purpose and can still be used to clean up and split paths. Individual elements are always better suited to path optimization than combined paths and you already know the few exceptions.
Check parameters
Some Ink/Stitch Parameter are easy to understand. Others are a little more hidden, but can have a confusing effect on the embroidery result. One example is the minimum stitch length. This value can be set document-wide in the Ink/Stitch Preferences (Extensions > Ink/Stitch > Prefrences). Up from the version v 3.1.0 there is also the option of setting the minimum stitch length on an object-based basis.
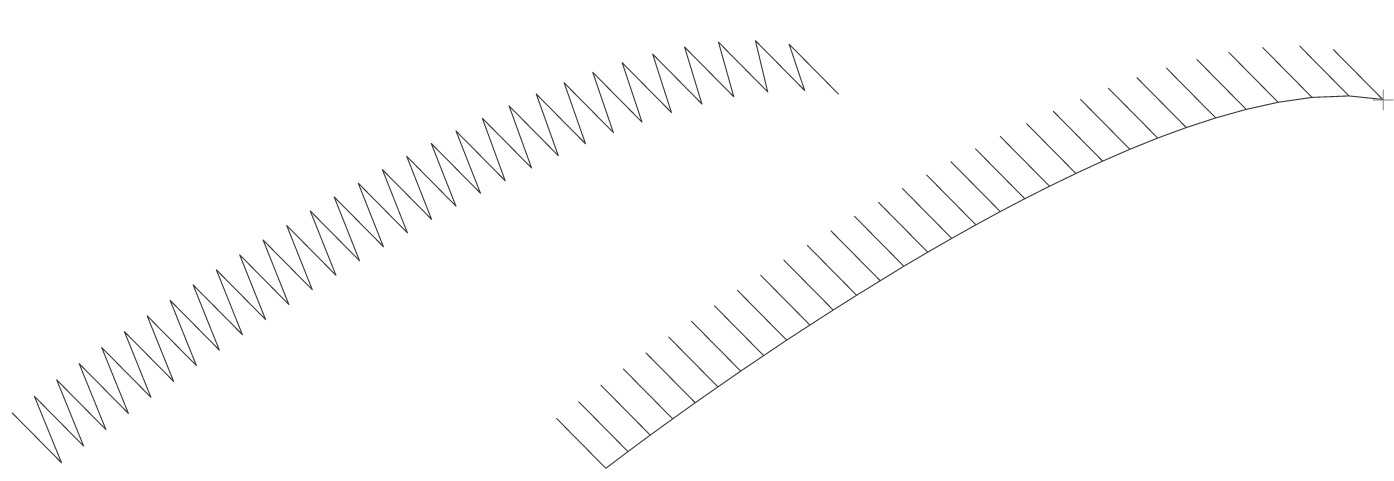
Both E-stitches shown in the image have the same parameters. On the left, the value for the minimum stitch length is smaller than the distance to the next point.
Other parameters can lead to an element no longer being able to be rendered. Settings for distances and sizes must be checked here. A good example of this is a meander pattern that is too large for a fill object that is too small.
Remove embroidery parameters
Extensions > Ink/Stitch > Troubleshoot > Remove embroidery settings
If nothing else helps, it might be a good idea to go back to zero and start again.
This tool can be used to remove all (or certain) parameters and commands from selected elements. In addition you can reset settings for the PDF output.
Inkscape: XML Editor
Edit > XML Editor
If you want to delve a little deeper into the subject, you can use the XML editor to view and change the file at code level. All Ink/Stitch parameters can be edited directly from here.
Test, test, test
Ink/Stitch offers a wide range of parameter settings.
Testing embroidery results using different parameters is part of the learning process when digitizing embroidery patterns.
Ink/Stitch offers a tool for this task: Generate Test Swatches from Selection.
It can be found under Extensions > Ink/Stitch > Edit > Generate Test Swatches from Selection.
This allows you to quickly create a grid with elements in which one embroidery parameter is continuously changed.
Embroider
There can also be sources of error when embroidering. When embroidering, pay attention to
- stabilization through suitable stabilizers
- hooping
- changing the needle regularly, using the right needle for the thread and fabric
- thread tension
- embroidery speed: fast is not always good
- etc.