⚠ This page is outdated. For more recent information have a look at the english original.
Satin Tools
Extensions > Ink/Stitch > Satin Tools include a number of useful helpers, making it easy to work with satin columns.
Example:
- Create a path with the help of the bezier curves tool (
B) - Run Convert Line to Satin
- Use the Params dialog to set an underlay
- Run Auto-Route Satin to recieve nicely routed satin columns

Tip: For faster access set shortcuts on specific satin tools.
Auto-Route Satin Columns…
This tool will replace your satins with a new set of satin columns in logical stitching order. Under-pathing and jump-stitches will be added as necessary and satins will be broken to facilitate jumps. The resulting satins will retain all of the parameters you had set on the original satins, including underlay, zig-zag spacing, etc.
Usage
- Select satin columns (prepared with underlay, etc.)
- Run
Extensions > Ink/Stitch > Satin Tools > Auto-Route Satin Columns... - Enable desired options and click apply
Tip: By default, it will choose the left-most extreme as the starting point and the right-most extreme as the ending point (even if these occur partway through a satin such as the left edge of a letter “o”). You can override this by attaching the “Auto-route satin stitch starting/ending position” commands.
Options
-
Enable Trim jump stitches to use trims instead of jump stitches. Any jump stitch over 1mm is trimmed. Trim commands are added to the SVG, so you can modify/delete as you see fit.
-
If you prefer to keep your previous order (which might be the case if you have overlaying satins), enable the option Preserve order of Satin Columns.
Convert Line to Satin
This extension will convert a stroke into a satin column with a specified width. After the conversion you will see the two rails and (possibly) lots of rungs, depending on the shape of your line.
Usage
- Draw a bezier curve (
B) - Set the stroke width in the “Fill and Stroke” panel (“Stroke style” tab), which you can access with
Shift+Ctrl+F - Run
Extensions > Ink/Stitch > Satin Tools > Convert Line to Satin
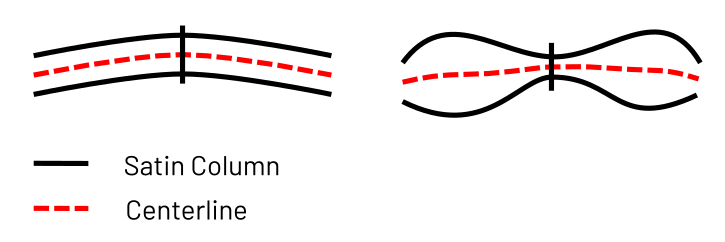
Convert Satin to Stroke
Satin to stroke will convert a satin column to it’s centerline. This can be useful, when you decide later in the designing process to turn a satin column into a running stitch. You can also use it to alter the thickness of your satin column, when pull compensation isn’t satisfying. In that case use this function to convert your satin column into a running stitch, set stroke width in the fill and stroke panel and run the “Connvert line to to satin” function.
This works best on evenly spaced satin columns.
Usage
- Select the satin column(s) you want to convert into a running stitch
- Run
Extensions > Ink/Stitch > Satin Tools > Convert satin to stroke... - Choose wether you want to keep selected satin column(s) or if you want to replace them
- Click apply
Cut Satin Column
Split a satin column at a specified point. The split happens at a stitch boundary to ensure that the two resulting satins sew just like the original. All parameters set on the original satin remain on the two new satins, and all rungs are retained. If one of the satins would have no rungs left, a new rung is added.
Usage
- Select a satin column (simple satin doesn’t work)
- Attach the “Satin split point” command using
Extensions > Ink/Stitch > Commands > Attach Commands to Selected Objects. - Move the symbol (or just the connector line’s endpoint) to point to the exact spot you want the satin to be split at.
- Select the satin column again.
- Run
Extensions > Ink/Stitch > Satin Tools > Split Satin Column. - The split point command and connector line disappear, and nothing else appears to have happened. Select your satin and you’ll see that it’s been split.
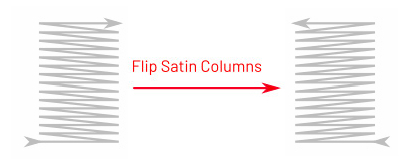
Flip Satin Column Rails
This is a little tool to help you to plan your stitch path precisely. E.g. flip satin columns to shorten connections between two sections.
A satin column which originally starts on the left rail and ends on the right, will start on the right rail and end on the left.
Usage
- Select one or more satin column(s)
- Run
Extensions > Ink/Stitch > Satin Tools > Flip Satin Columns
Stroke to Live Path Effect Satin
Converts a stroke into a satin using a live path effect. This makes it more adaptable in width and shape as a normal satin column.
Usage
- Select a Stroke
- Run
Extensions > Ink/Stitch > Tools: Satin > Stroke to Live Path Effect Satin... - Set the approximate sizes that you wish your satin to be
- Click on apply
Apply path effect
Use Path > Object to path to convert this to a standard satin column.
Update and change the pattern
Now you can change the pattern in the following ways.
- Update the path as every other path in inkscape with the node tool
- Change pattern by opening the path effects dialog (
Path > Path Effects).- Make the satin wider or thinner by manipulating the
widthsetting. -
Change the pattern element, by clicking
Edit on-canvasin thepattern sourcesetting.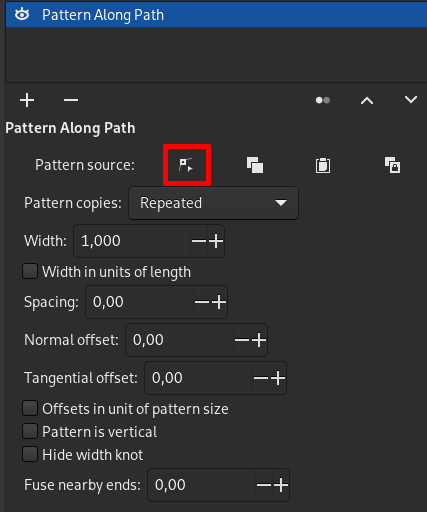
- Make the satin wider or thinner by manipulating the
- Change the pattern by running this tool again
- Convert it to a normal path (
Shift + Ctrl + C) and refine the path manually (it will then lose the path effect functionality)
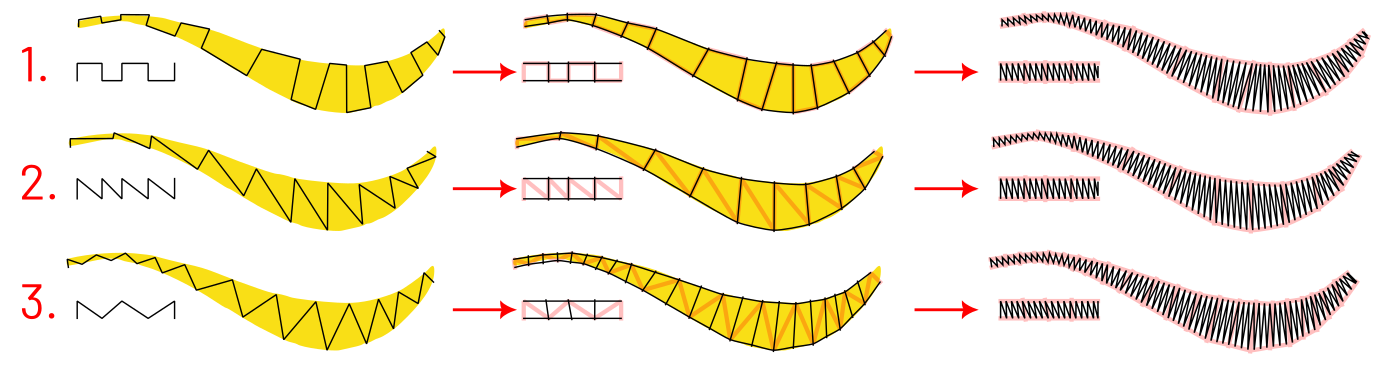
Zigzag Line to Satin
When you trace a pattern manually this tool can be helpful to do it all in one run. Instead of drawing first the two rails and then several rungs, this tools allows to draw a square- or zigzag line which then can be converted into the satin column style.
Usage
- Draw you shape with your prefered pattern style.
- Select the shape and run
Extensions > Ink/Stitch > Tools: Satin > Zigzag Line to Satin- Select your path style (pattern)
- Chose wether the resulting path should be smoothed out or straight lines
- Chose if rungs should be inserted or not. The resulting path will always have the same amount of nodes on both rungs.
Pattern styles
- All patterns start and end with a rung.
- For square (1) and sawtooth (2) style pattern draw one rung after the other.
- The zigzag (3) style creates rungs from each peak on each rail to the midpoint between the peaks of the other rail.
If you see something like in the image below, you most likely chose the wrong pattern for your stroke setup.