⚠ This page is outdated. For more recent information have a look at the english original.
Fill Stitch
What it is
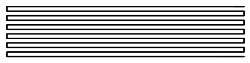
 Fill stitch is used to fill big areas with a color.
Methods
Ink/Stitch offers four methods to create fill stitches: Auto-Fill (this page), Contour Fill , Guided Fill and Legacy Fill (this page).
Auto-Fill
How to Create
To use Auto-Fill, create a closed path with a fill color. This algorithm works for complex shapes with or without holes.
Info: If you are having issues with fill areas run the “fill repair tool” on them. This will solve most of your issues very easily.
Set Start and End Point
Set start and end points for autofill objects with Visual commands.
Params
Run Extensions > Ink/Stitch > Params to tweak the settings to your needs.
| Settings | Description | |
|---|---|---|
| Automatically routed fill stitching | ☑ | Must be enabled for these settings to take effect. |
| Fill method | AutoFill | Must be set to auto fill for rows of stitches. |
| Expand | 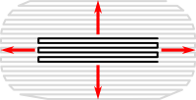 |
Expand the shape before fill stitching, to compensate for gaps between shapes. |
| Angle of lines of stitches |  |
The angle of the rows of stitches, in degrees. 0 is horizontal, and the angle increases in a counter-clockwise direction. Negative angles are allowed. |
| Maximum fill stitch length | 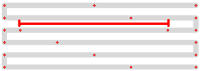 |
The length of each stitch in a row. “Max” is because a shorter stitch may be used at the start or end of a row. |
| Spacing between rows |  |
Distance between rows of stitches |
| Running stitch length |  |
Length of stitches used when moving from section to section |
| Skip last stitch in each row | 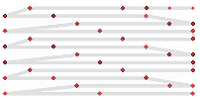 |
The last stitch in each row is quite close to the first stitch in the next row. Skipping it decreases stitch count and density. |
| Stagger this many times before repeating |  |
Stitches are staggered so that neighboring rows of stitches don’t all fall in the same column (which would create a distracting valley effect). Setting this dictates the length of the cycle by which successive stitch rows are staggered. Fractional values are allowed and can have less visible diagonals than integer values. |
| Underpath |  |
Must be enabled to let running stitches travel inside shape instead of around the border when moving from section to section |
| Allow lock stitches | Enables lock stitches in only desired positions | |
| Force lock stitches | ☑ | Sew lock stitches after sewing this element, even if the distance to the next object is shorter than defined by the collapse length value in the Ink/Stitch preferences. |
| Trim After | ☑ | Trim the thread after sewing this object. |
| Stop After | ☑ | Stop the machine after sewing this object. Before stopping it will jump to the stop position (frame out) if defined. |
Underlay
If stitch one layer of stitches as a fill individual stitches tend to sink into the fabric (even if it’s thin) and the fill will appear sparse. The fabric may even stick up between rows.
To solve this, you need underlay. This is an initial layer of stitches that hold up the final stitches. Underlay for fill stitch usually comprises of fill stitching 90 degrees offset from the final fill (called “top stitching”). The row spacing should be much wider than in the top stitching. The goal is to flatten out the fabric and give the top stitches “rails” to sit on.
Underlay is enabled in Ink/Stitch by default. In some rare cases (e.g. a fill layer with big row spacing) you will want to disable it. Uncheck the checkbox “Underlay” in the AutoFill Underlay tab in your params dialogue window. Other cases will require multiple underlay. To enable, enter a space separated list of fill angles and it will result into multiple underlay layers.
| Settings | Description |
|---|---|
| Underlay | Must be enabled for these settings to take effect. |
| Fill angle | Defaults to 90 degrees angle to the top layer. It’s the best value for most cases. But sometimes you might want to change your underlay directions. It is also possible to enter a comma separated list to receive multiple underlays. |
| Inset | Inset to cover the underlay entirely by the top layer. Negative values are possible (usefull for “knockdown” stitches). |
| Max stitch length | Maximum stitch length. Stitches can be shortened at the start or the end of a row. |
| Row spacing | Underlay row spacing. Defaults to 3x the spacing of the top layer. |
| Skip last stitch in each row | The last stitch in each row is quite close to the first stitch in the next row. Skipping it decreases stitch count and density. |
| Underpath | Must be enabled to let running stitches travel inside shape instead of around the border when moving from section to section |
Samples Files Including Fill Stitches

Applique example file

Color Blending Methods

Free Standing Lace - Butterfly
Free Standing Lace - Butterfly

Fringe example file
Ink/Stitch Logo & Branding Guide
Ink/Stitch logo as SVG file, digitized version and branding guide.

Software Freedom Day example file
Legacy Fill
Legacy Fill is the old manual mode before automatic fill routing was implemented.
In legacy fill, the extension will still break up the shape into sections, each of which can be embroidered in one go. Then these sections will be fill-stitched one at a time, jumping directly between sections.
You’ll almost certainly want to break your shape up into smaller shapes and connect them using running stitches. It’s a painstaking process, made more so because you’ll need to do it twice: once for the underlay and again for the top stitching.
Run Extensions > Ink/Stitch > Params to alter stitch details.
| Settings | Description |
|---|---|
| Manually routed fill stitching | Must be enabled for these settings to take effect. |
| Fill method | Must be set to legacy fill |
| Angle of lines of stitches | The angle of the rows of stitches, in degrees. 0 is horizontal, and the angle increases in a counter-clockwise direction. Negative angles are allowed. |
| Maximum fill stitch length | The length of each stitch in a row. “Max” is because a shorter stitch may be used at the start or end of a row. |
| Spacing between rows | Distance between rows of stitches. |
| Skip last stitch in each row | The last stitch in each row is quite close to the first stitch in the next row. |
| Stagger row this many times before repeating | Stitches are staggered so that neighboring rows of stitches don’t all fall in the same column (which would create a distracting valley effect). Setting this dictates how many rows apart the stitches will be before they fall in the same column position. |
| Flip fill | The flip option can help you with routing your stitch path. When you enable flip, stitching goes from right-to-left instead of left-to-right. Using flip and rotating 180 additional degrees (by adding or subtracting 180 from angle), you can cause fill stitching for a given shape to start from any of the four possible corners. |
| Force lock stitches | Sew lock stitches after sewing this element, even if the distance to the next object is shorter than defined by the collapse length value in the Ink/Stitch preferences. |
| Allow lock stitches | Enables lock stitches in only desired positions |