Tools: Satin
Extensions > Ink/Stitch > Tools: Satin include a number of useful helpers, making it easy to work with satin columns.
Example:
- Create a path with the help of the bezier curves tool (
B) - Run Stroke to Satin
- Use the Params dialog to set an underlay
- Run Auto-Route Satin to recieve nicely routed satin columns

Tip: For faster access set shortcuts on specific satin tools.
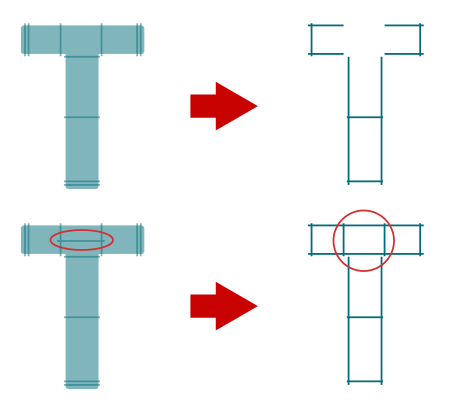
Auto-Route Satin Columns…
This tool will replace your satins with a new set of satin columns in logical stitching order. Under-pathing and jump-stitches will be added as necessary and satins will be broken to facilitate jumps. The resulting satins will retain all of the parameters you had set on the original satins, including underlay, zig-zag spacing, etc.
Usage
Tip: By default, it will choose the left-most extreme as the starting point and the right-most extreme as the ending point (even if these occur partway through a satin such as the left edge of a letter “o”). You can override this by attaching the “Auto-route satin stitch starting/ending position” commands.
- Select satin columns (prepared with underlay, etc.)
- Run
Extensions > Ink/Stitch > Satin Tools > Auto-Route Satin Columns... - Enable desired options and click apply
Options
-
Enable Trim jump stitches to use trims instead of jump stitches. Any jump stitch over 1mm is trimmed. Trim commands are added to the SVG, so you can modify/delete as you see fit.
-
If you prefer to keep your previous order (which might be the case if you have overlaying satins), enable the option Preserve order of Satin Columns.
-
Keep original paths will indicate if the original elements will be removed or kept.
Stroke to Satin
This extension will convert a stroke into a satin column with a specified width. After the conversion you will see the two rails and (possibly) lots of rungs, depending on the shape of your line.
Usage
- Draw a bezier curve (
B) - Set the stroke width in the “Fill and Stroke” panel (“Stroke style” tab), which you can access with
Shift+Ctrl+F - Run
Extensions > Ink/Stitch > Tools: Satin > Stroke to Satin
Cut Satin Column
Split a satin column at a specified point. The split happens at a stitch boundary to ensure that the two resulting satins sew just like the original. All parameters set on the original satin remain on the two new satins, and all rungs are retained. If one of the satins would have no rungs left, a new rung is added.
Usage
- Select a satin column (simple satin doesn’t work)
- Attach one or more “Satin split point” commands using
Extensions > Ink/Stitch > Commands > Attach Commands to Selected Objects. - Move the symbol (or just the connector line’s endpoint) to point to the exact spot you want the satin to be split at.
- Select the satin column again.
- Run
Extensions > Ink/Stitch > Tools: Satin > Split Satin Column. - The split point command and connector line disappear, and nothing else appears to have happened. Select your satin and you’ll see that it’s been split.
This feature will be part of an upcoming Ink/Stitch release. It is not yet integrated in Ink/Stitch.
You can use multiple commands on the same satin column to split it into multiple pieces in a single action.
Fill to Satin
Fill to satin can be used to convert a fill into a satin. It is a semi-automatic function and requires a little manual work.
Usage
- Prepare your fill objects. It can be necessary that you need to split up your fill to simpler shapes with the shape builder tool or with other path editing tools in Inkscape.
- Make sure the fill has only a fill and not a stroke color
-
Create rungs with a stroke color (and no fill color). Rungs help define how the fill shape is going to be converted.
Make sure to add a sufficient number of rungs. Especially when you want to enable the option
start/end at rungwhich will remove a portion from the open ends. - Select fill and rungs
- Run
Extensions > Ink/Stitch > Tools: Satin > Fill to Satin... - Enable desired options
- Click
Apply
Options
| Option | Descprition |
|---|---|
| Start / end at rung | When enabled open end sections will be removed from the satin. Please note, that you need to define a sufficient number of rungs or you will see missing parts. This option is useful, as in most cases you want your satin to cut short as it pushes out towards the ends when you stitch it out. |
| Center-walk underlay | Adds a default center-walk underlay to the satin(s) |
| Contour underlay | Adds a default contour underlay to the satin(s) |
| Zig-zag underlay | Adds a default zig-zag underlay to the satin(s) |
| Keep original paths | Keep or remove selected paths |
Intersections
Use bridges at intersections to inform Ink/Stitch how to connect the satin columns. Unbridged intersections simply leave a gap.
Bridges have to be completely inside the fill element and cannot cross the outline.
Sample file
Download the fill to satin playground file
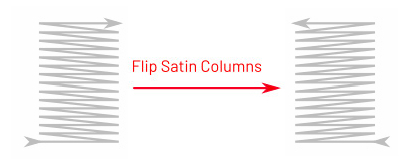
Flip Satin Column Rails
This is a little tool to help you to plan your stitch path precisely. E.g. flip satin columns to shorten connections between two sections.
A satin column which originally starts on the left rail and ends on the right, will start on the right rail and end on the left.
Usage
- Select one or more satin column(s)
- Run
Extensions > Ink/Stitch > Tools: Satin > Flip Satin Columns
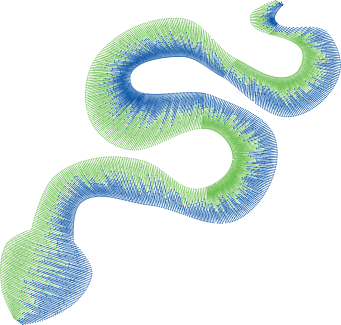
Multicolor Satin
This extension creates copies of selected satins to mimic a multicolor satin
If you want to understand how this extension works internally, read this.
Usage
- Select one or more satin column
- Open
Extensions > Ink/Stitch > Tools: Satin > Multicolor Satin - Set your prefered options and colors in the colorize tab
- Apply
Options
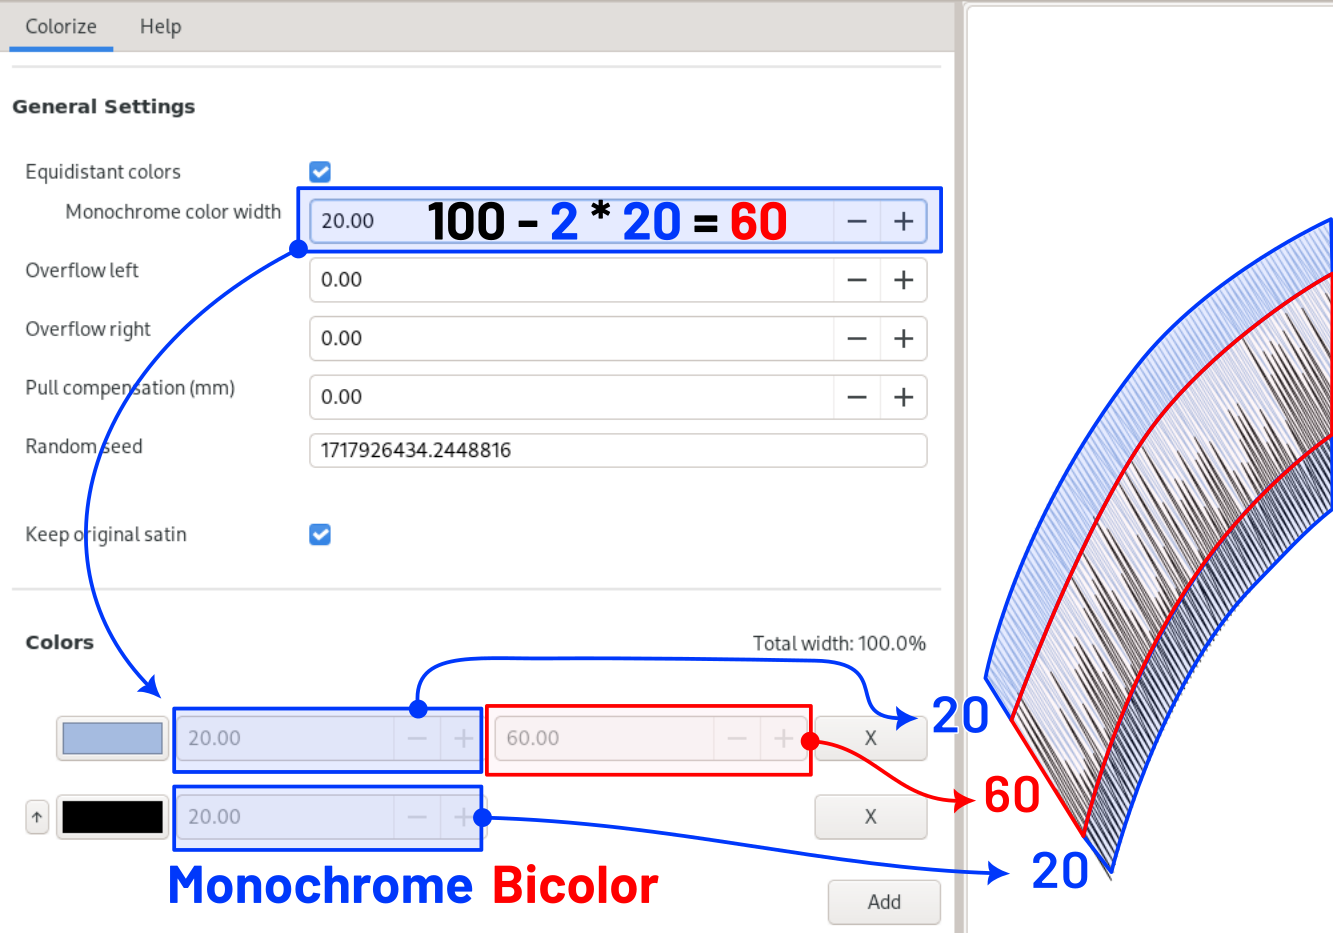
General Settings
- Equidistant colors: Choose if the colors are equidistant or not.
- If checked the color width and margins are defined for all colors by the
monochrome color widthvalue. - If unchecked you are able to independantly chose width and margins for each color.
- If checked the color width and margins are defined for all colors by the
- Left overflow (%): Adds a jagged edge to the left side of the satin
- Right overflow (%): Adds a jagged edge to the right side of the satin
- Pull compensation (mm): Makes the satin columns wider and will overlap the color sections to avoid gaps
-
Random seed: Change the value to change the appearance of randomized params
- Keep original satin: whether the original satin should be deleted or not
- Adjust underlay per color: applies only when the original satin column has underlays
- If checked, the underlays will be applied to each color separately, excluding the multicolor sections
- If unchecked, only the first color will use an underlay, covering the whole area
Colors
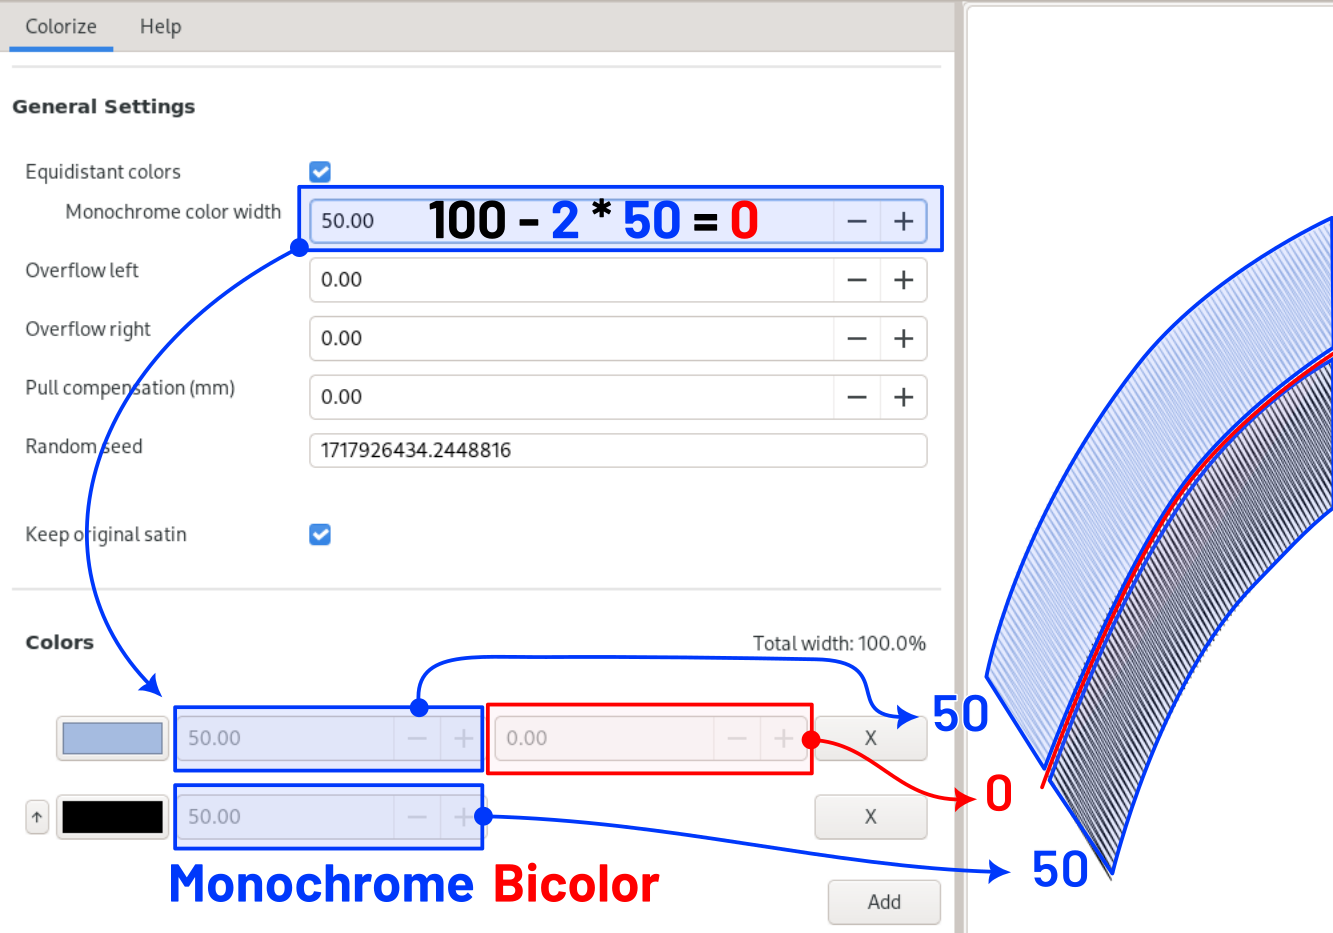
Width values are given in percentages. Make sure all numbers for all colors add up to 100%.
Please note that the first input field in each color definition sets the width of the area with only one color. The second input box defines the margin to the next color. This is the width of the area with the “color transition”. When equidistant colors colors is checked, reduce the value for monochrome color width to receive a wider field of bicolor sections.
Stroke to Live Path Effect Satin
Converts a stroke into a satin using a live path effect. This makes it more adaptable in width and shape as a normal satin column.
Please avoid sharp corners. As with normal satins, it is better to split up the path at sharp corners. In some cases it may be necessary to stretch out node handles or to add more nodes to achieve a consistant width.
Usage
- Select a Stroke or a Live Path Effect Satin
- Run
Extensions > Ink/Stitch > Tools: Satin > Stroke to Live Path Effect Satin... - Set the approximate sizes that you wish your satin to be
- Click on apply
Options
| Pattern | 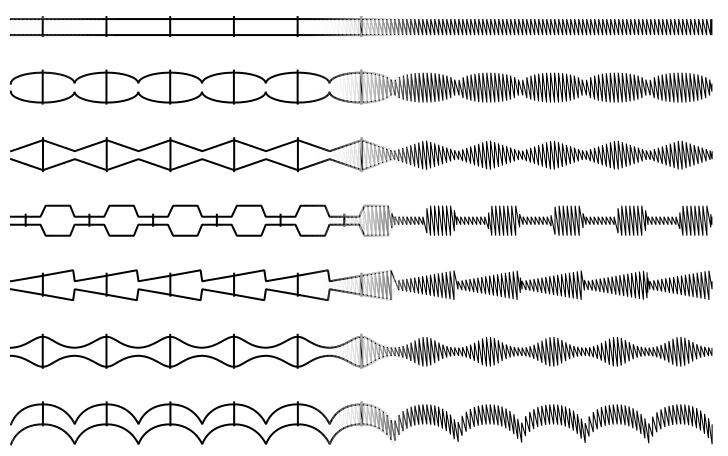 |
Choice of the pattern to be applied repeatedly to the satin column |
| Min Width (mm) | 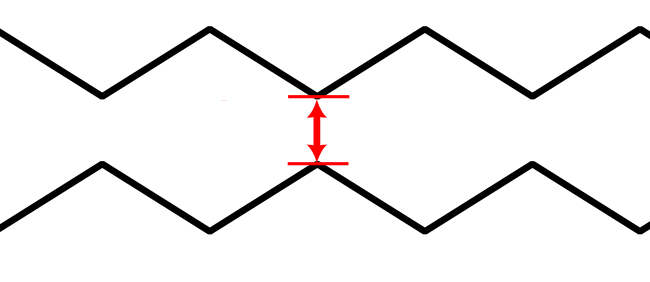 |
Pattern width at the narrowest point |
| Max Width (mm) | 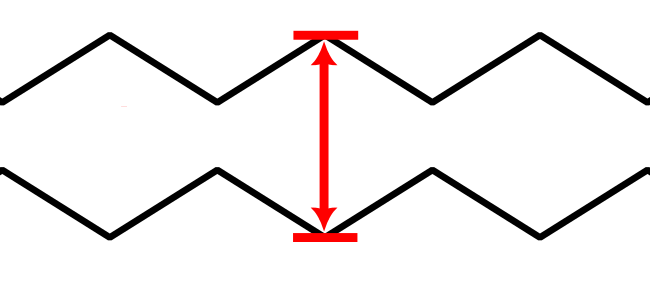 |
Pattern width at the widest point |
| Pattern Length (mm) | 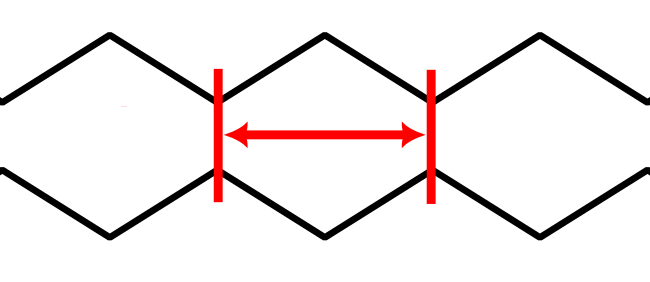 |
Length of the pattern |
| Stretched | 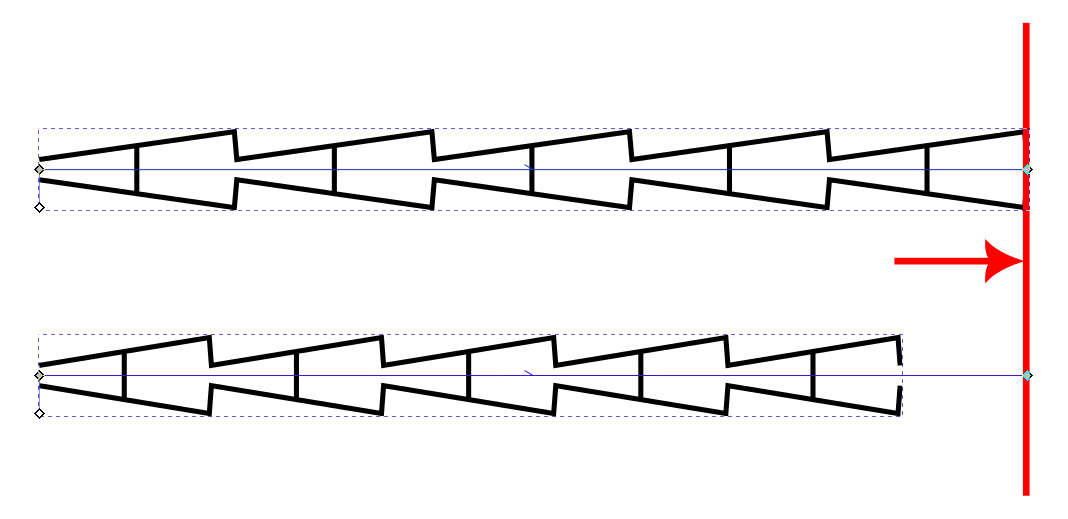 |
If checked the pattern will be stretched so that its pattern repeats occupy exactly the length of the line, otherwise there may be a gap at the end of the line |
| Add rungs | 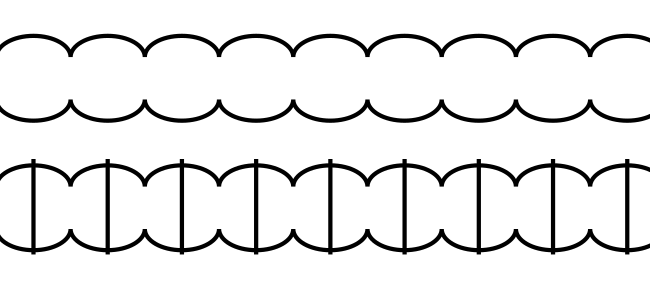 |
Since the patterns (usually) all have the same number of nodes on both rails, the rungs are optional. |
| Path specific | ● If checked, the satin column has its own pattern. A modification of any option only influences this column. Element transforms can be applied ● If unchecked, the pattern is common to all satin columns using this effect and pattern. Modifying the pattern for one of them modifies it for all of them. Element transforms may lead to an unexpected column width. |
Update and change the pattern
Now you can change the pattern in the following ways.
- Update the path as every other path in inkscape with the node tool
- Change pattern by opening the path effects dialog (
Path > Path Effects).- Make the satin wider or thinner by manipulating the
widthsetting. -
Change the pattern element, by clicking
Edit on-canvasin thepattern sourcesetting.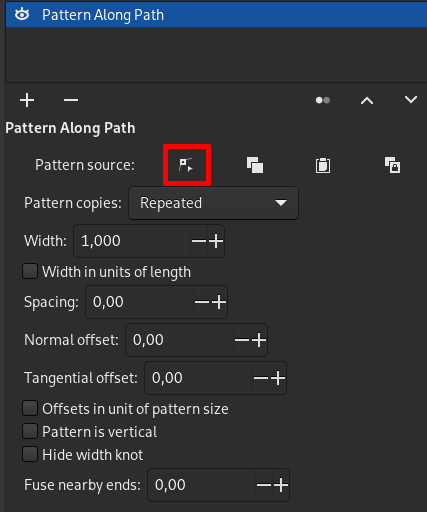
- Make the satin wider or thinner by manipulating the
- Change the pattern by running this tool again
- Convert it to a normal path (
Shift + Ctrl + C) and refine the path manually (it will then lose the path effect functionality)
Apply path effect
Use Path > Object to path to convert this to a standard satin column.
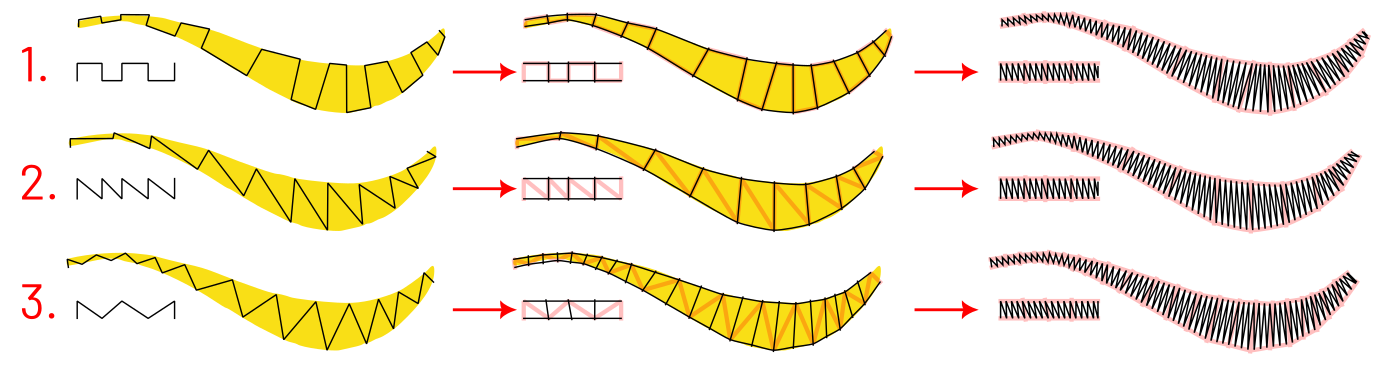
Zigzag Line to Satin
When you trace a pattern manually this tool can be helpful to do it all in one run. Instead of drawing first the two rails and then several rungs, this tool allows to draw a square- or zigzag line which then can be converted into the satin column style.
Usage
- Draw you shape with your prefered pattern style.
- Select the shape and run
Extensions > Ink/Stitch > Tools: Satin > Zigzag Line to Satin- Select your path style (pattern)
- Chose whether the resulting path should be smoothed out or straight lines
- Chose if rungs should be inserted or not. The resulting path will always have the same amount of nodes on both rails.
Pattern styles
- All patterns start and end with a rung.
- For square (1) and sawtooth (2) style pattern draw one rung after the other.
- The zigzag (3) style creates rungs from each peak on each rail to the midpoint between the peaks of the other rail.
If you see something like in the image below, you most likely chose the wrong pattern for your stroke setup.
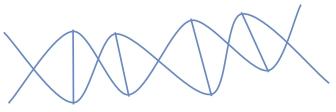
Sharp edges with smoothed option on
When you are using the smooth option it is still possible to quickly produce sharper edges (please be reasonable in terms of the satin column rules).
Sharp edges are indicated by two points that are close together.