Zig-Zag Stitch (Simple Satin)
Description
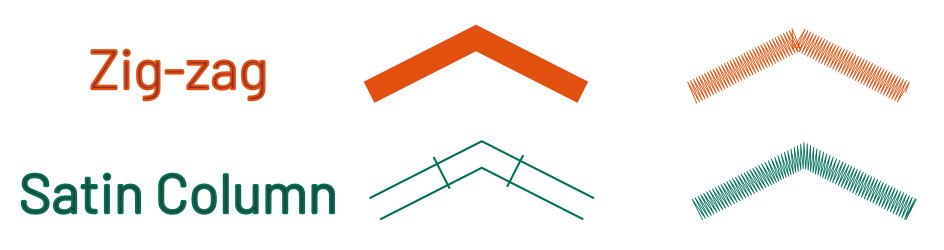
Zig-Zag stitches are a very basic option to create a simple zig-zag line. It is only suited for straight lines.
Creation
Zigzag stitch is created by a path with a stroke color.
Ink/Stitch will create stitches along the path using the stroke width you specified as the zigzag width. Go to Object > Fill and Stroke... and set the desired stroke width in the Stroke style tab.

The stitch direction can be influenced by the path direction. If you want to swap the starting and ending point of your zigzag run Path > Reverse.
If an object consists of multiple paths, they will be stitched in order with a jump between each subpath.
Parameters
Open Extensions > Ink/Stitch > Params to change parameters to your needs.
Some parameters will be part of an upcoming Ink/Stitch release. It is not yet integrated in Ink/Stitch.
Running stitch along paths
Must be selected to use these settings.
Method
Determines which stitch type to use.
Select ZigZag Stitch
Repeats
Defines how many times to stitch along the path
- Odd number: stitches will end at the end of the path
- Even number: stitching will return to the start of the path
Bean stitch number of repeats
Determines the number of times to repeat each stitch.
- A value of
0does not repeat the stitch (normal stitch) - A value of
1repeats each stitch three times (forward, back, forward). - A value of
2repeats the stitch six times. - By entering multiple numbers, it is possible to define a custom repeat pattern. For instance
0 1will create alternating single and triple stitches (≡-≡-≡).
Minimum stitch length
Stitches smaller than this value will be removed.
Overwrites the global minimum stitch length setting.
Zig-zag angle
Creates spoke/radial effects on curves by rotating the zig-zag direction by this angle (degrees).
Pull compensation
Zigzag stitches pull the fabric together, resulting in a column narrower than you draw in Inkscape.
This widens the zigzag line. You can use it to change the width of your zigzag. Negative values are allowed.
Zig-zag spacing (peak-to-peak)
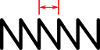
The peak-to-peak distance between zig-zags
Minimum jump stitch length
Shorter distances to the next object will have no lock stitches.
Overwrites the global minimum jump stitch length setting.
Allow lock stitches
Enables lock stitches in only desired positions
Force lock stitches
If checked, lock stitches are sewn after this element,regardless of the minimum jump stitch length value.
Tack stitch
Determines the type of tack stitch.
Tack stitches are small stitches at the beginning of a stitch. They help to secure the beginning of the thread.
Read more
Lock stitch
Determines the type of lock stitch.
Lock stitches are small stitches at the end of stitch. They help to secure the end of the thread.
Read more
Scale tack stitch / Scale lock stitch
Some lock stitches have a scaling option in either mm or percent.
Custom path
This setting is only available for custom lock stitches.
Enter a custom mm or svg path.
The first node of an svg path will not be emboirdered, but represents the first (tack) or last (lock) stitch of the element.
Read more
Trim After
Determines if the thread is trimmed after sewing this object.
Stop After
Determines if the machine is stopped after sewing this object. Before stopping it will jump to the stop position (frame out) if defined.
Tips:
Satin Column: A Better Option
It is not recommended to use the zigzag stitch mode to create a satin border, use Satin Column instead.
Ink/Stitch will plot zig-zags to the left and right of the line from start to end, but it won’t do anything special around curves and corners. Sharper curves and corners will result in sparse stitching around the outside of the curve and dense stitching around the inside. This won’t look good and may even poke holes in the insides of corners.