Visualize
Simulator
Select the objects you wish to see in a simulated preview. If you want to watch your whole design being simulated, select everything (Ctrl+A) or nothing.
Then run Extensions > Ink/Stitch > Visualize and Export > Simulator and enjoy.
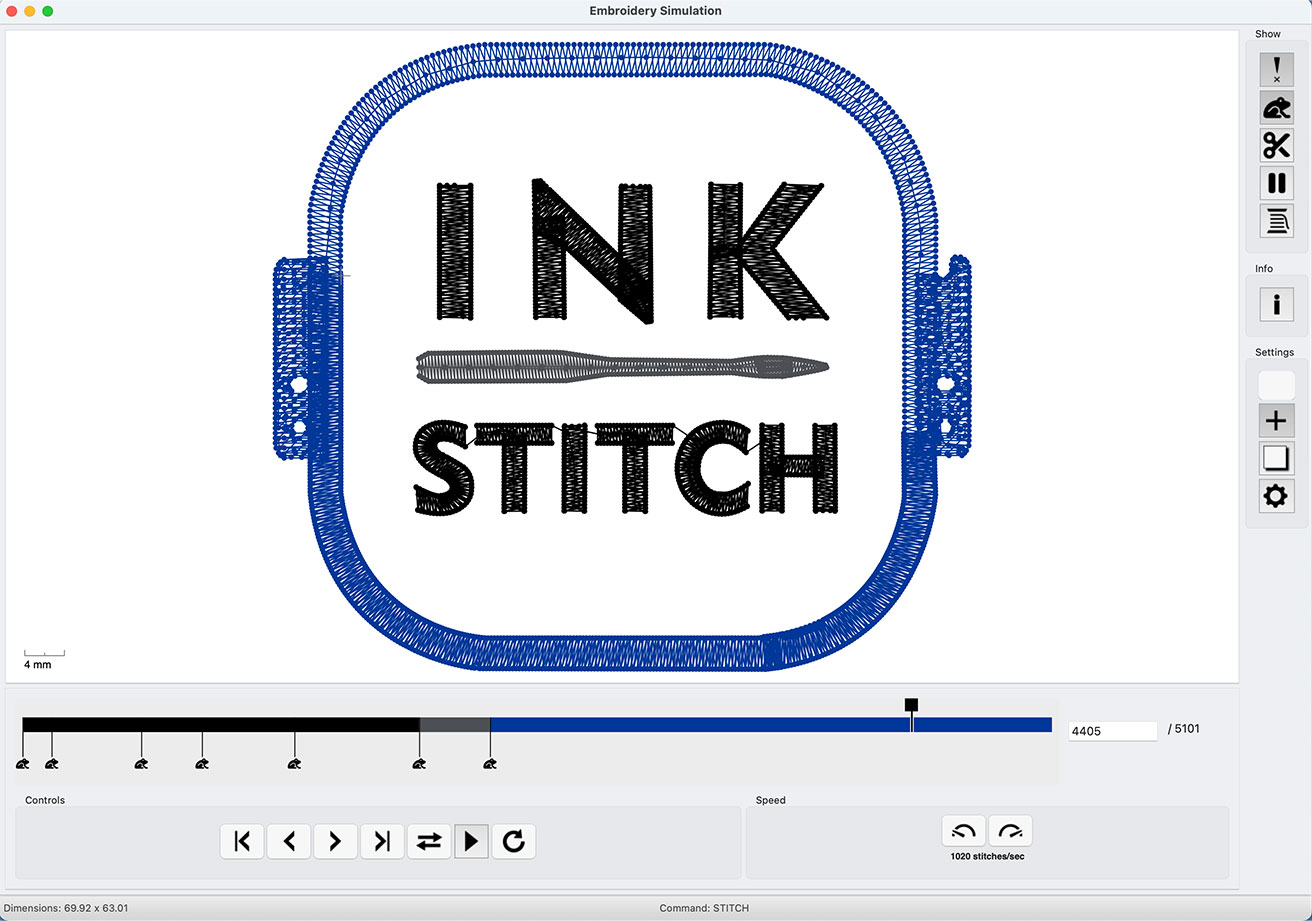
Buttons and Shortcut Keys
| Button | Effect | Shortcut Keys | |
|---|---|---|---|
| Controls | |||
| Go back to previous command | |||
| Go back one stitch | |||
| Go forward one stitch | |||
| Go to next command | |||
| Switch animation direction | |||
| start/pause animation | |||
| restart | |||
| Speed | |||
| render slower | |||
| render faster | |||
| Show | |||
| Needle penetration point | |||
| Jumps | |||
| Trims | |||
| Stops | |||
| Color Changes | |||
| Info | |||
| Design Information | |||
| Settings | |||
| Change background color | |||
| Show crosshair | |||
| Show page | |||
| Open setting dialog to set speed, line width and needle point size |
It is also possible to zoom and pan the simulation with the mouse.
Stitch Plan Preview
The stitch plan preview inserts a stitch plan onto the canvas. Depending on your settings, the stitch plan preview will be placed on top of the design or on the right side of the canvas (option: move stitch plan beside the canvas).
To access the stitch plan preview run Extensions > Ink/Stitch > Visualize and Export > Stitch Plan Preview....
Options
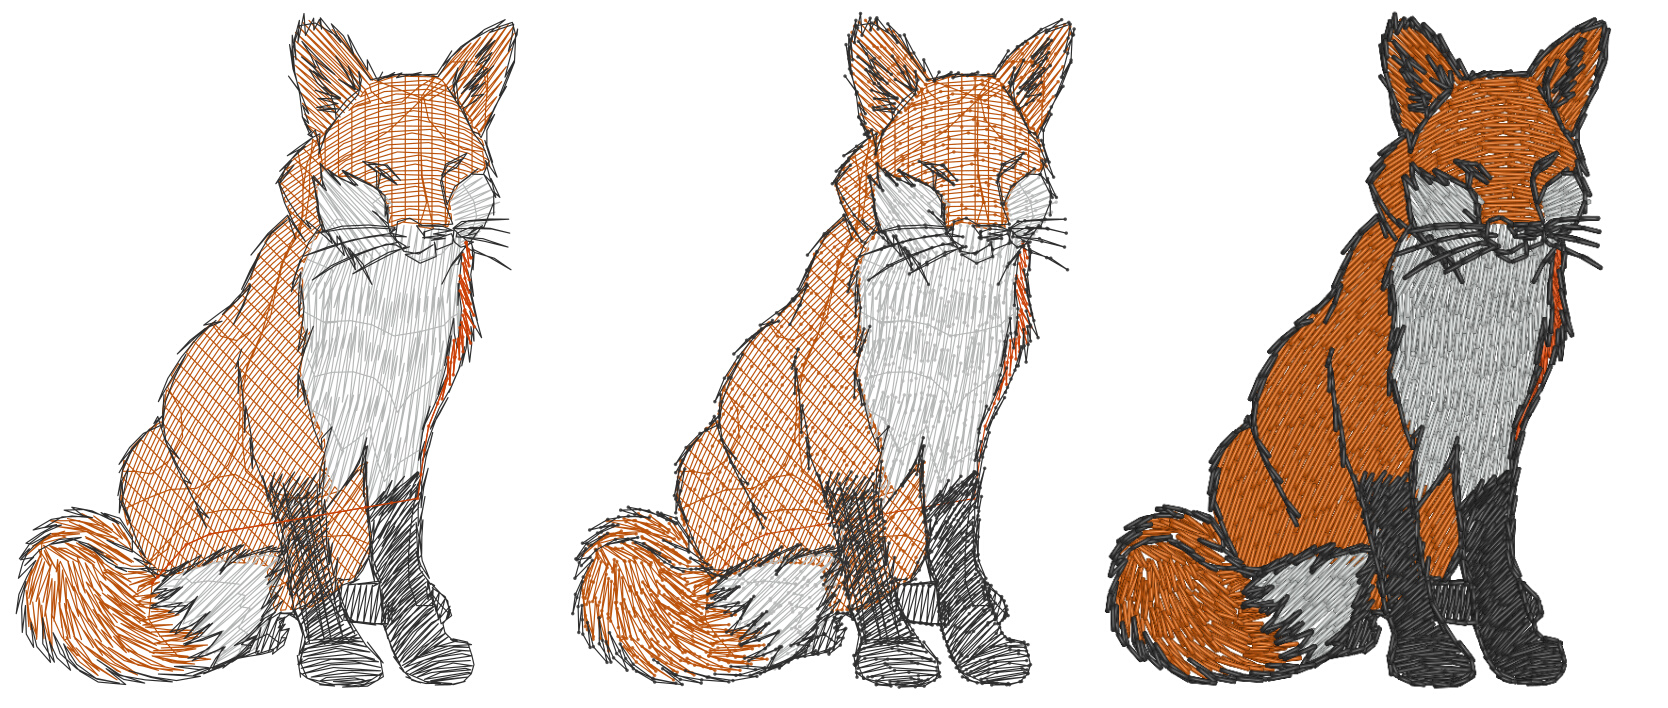
From left to right: 1. Render mode simple, 2. Render mode simple with needle points, 3. Render mode realistic
Image source: Pixabay
- Design layer visibility defines the visibility of the original design layer.
- unchanged leave it as is
- hidden hide the original design
- lower opacity display original design with lower opacity
- Render Mode
- Simple: simple line drawing
- Realistic: Realistic preview output as png image into the canvas (8-bit)
- Realistic High Quality Realistic preview output as png image into the canvas (16-bit)
-
Realistic vector (slow) Vector output with realistic filters
Slow means, that it has the capability to slow down Inkscape after the rendering process and even may make it freeze. So use with care on complex designs and save your design before you render the stitch plan.
- Move stitch plan beside the canvas Displays the preview on the right side of the canvas. If not enabled,the stitch plan will be placed on top of your design. In that case you may want to update your design visibility to eather hidden or lower opacity.
- Needle points displays needle points if enabled
- Lock make stitch plan insensitive to mouse interactions (makes it easier to work on the actual design while the stitch plan is active)
- Display command symbols
-
Render jump stitches
- Add ignore layer command
- Overide last stitch plan If checked the new stitch plan will replace the previous one, uncheck if you wish to keep the previous stitch plan
Design workflow with shortcut keys
Set shortcut keys for both, stitch plan preview and Undo stitch plan (see below) and it will greatfully support your designing workflow.
- We recommend to set the shortcut key to the
no preferencemethod in the shortcut key menu. The extension will then run directly (without the settings window) with the last applied settings. - Enable the
lockoption, so you can still acceess every path without interference with the stitch plan element(s). - Ensure that the
Override last stitch planoption is enabled, otherwise you will end up with multiple stitch plans on canvas.
Undo Stitch Plan
Using a stitch plan overlay with hidden or lower density elements helps to get a visual idea of how the design will look in the end. Sometimes it can be helpful to keep the stitch plan as a visual help while working on new elements. But for the export or for changes at existing elements during the workflow you will need the original elements back. Delete the stitch plan, unhide original elements or reset the opacity to normal isn’t a lot of fun. This extension is meant to help with this workflow.
Run Extensions > Ink/Stitch > Visualize and Export > Undo Stitch Plan Preview
Density Map
- Select objects if you want the density map only for some objects, otherwise run without any selection
- Run
Extensions > Ink/Stitch > Visualize and Export > Density Map - Set color ranges and apply
- Inspect (zoom in)
- Undo with
Ctrl + Z
This will display red, yellow and green dots on top of your elements so you can identify areas of high density easily.
Options
-
Red / yellow markers
Define up from many stitches in which radius should dots should be colored red or yellow
-
Design layer visibility
Define if Ink/Stitch should leave the design layer unchanged, hide id or lower opacity
-
Indicator size
Define the size of the dots in document units
Display stacking order
This extension inserts numbered labels for selected elements into the document to visualize the stitch order.
- Run
Extensions > Ink/Stitch > Visualize and Export > Display stacking order.... - Choose font size
- Click on apply
Print PDF
Information about the print pdf preview are collected in another section: more info about the pdf export