Linear Gradient Fill
What it is
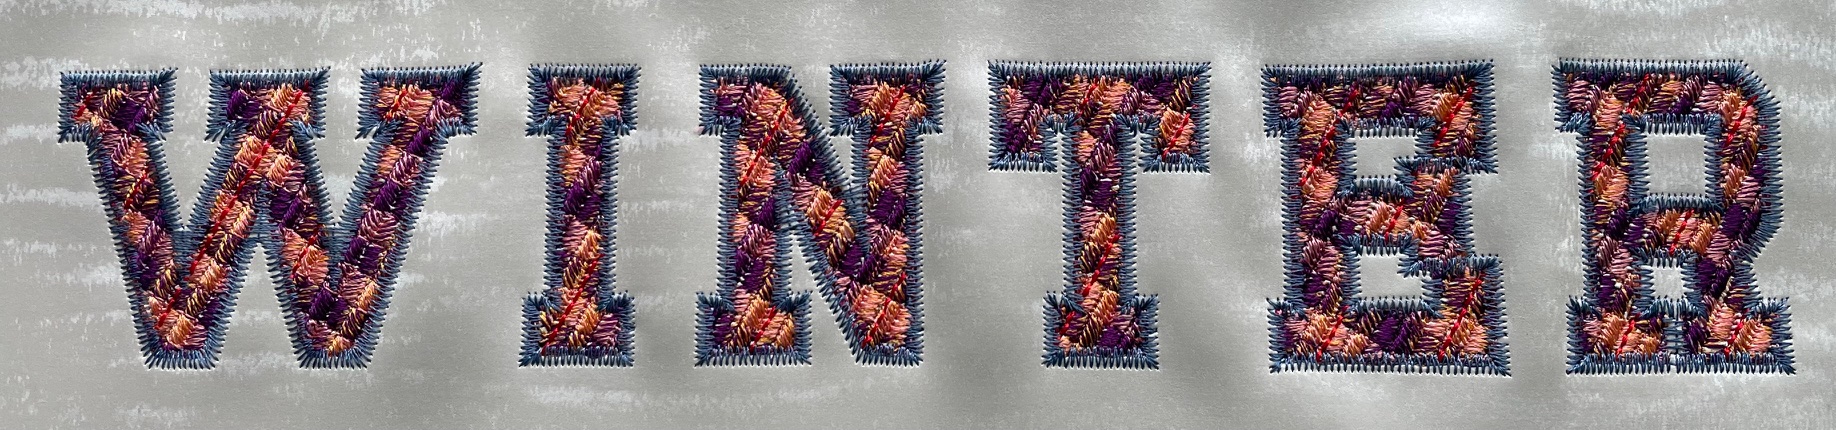
 Linear gradient fill uses Inkscapes linear gradient color to create seamless gradients with a consistent stitch positioning.
How to Create
- Create a closed path. The shape may have holes.
- In the
Fill and Strokedialog, select a linear gradient as a fill and adjust colors. On canvas adjust the gradient angle. The stitch angle will have a 90 degree angle to gradient direction.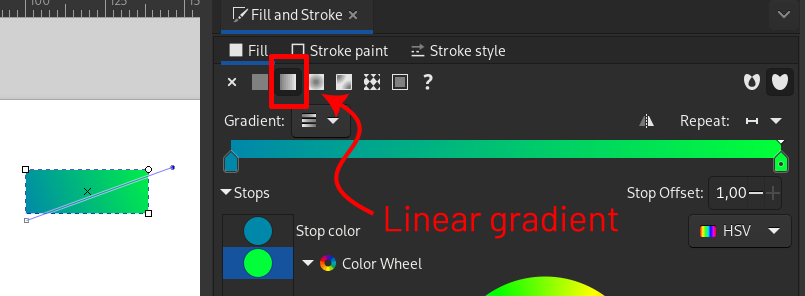
- Open the params dialog (
Extensions > Ink/Stitch > Params) and selectLinear Gradient Fillas the fill method Set the params as you wish and Apply
Set Start and End Point
Set start and end points for autofill objects with Visual commands.
Params
Run Extensions > Ink/Stitch > Params to tweak the settings to your needs.
| Settings | Description | |
|---|---|---|
| Automatically routed fill stitching | ☑ | Must be enabled for these settings to take effect. |
| Fill method | Linear Gradient Fill | Linear Gradient Fill must be selected. |
| Expand |  |
Expand the shape before stitching, to compensate for gaps between shapes. |
| Maximum fill stitch length | The length of each stitch in a row. “Max” is because a shorter stitch may be used at the start or end of a row. | |
| Spacing between rows | Distance between rows of stitches. | |
| Stagger row this many times before repeating | Stitches are staggered so that neighboring rows of stitches don’t all fall in the same column (which would create a distracting valley effect). Setting this dictates how many rows apart the stitches will be before they fall in the same column position. | |
| Skip last stitch in each row | The last stitch in each row is quite close to the first stitch in the next row. | |
| Stop at ending point | ☑ | If this option is disabled, the ending point will only be used to define a general direction for stitch routing. When enabled the last section will end at the defined spot. |
| Running stitch length | For circular fill this is the overall stitch length. | |
| Running stitch tolerance | All stitches must be within this distance from a path. A lower tolerance means stitches will be closer together. A higher tolerance means sharp corner may be rounded. | |
| Randomize stitch length | Randomize stitch length and phase instead of dividing evenly or staggering. This is recommended for closely-spaced curved fills to avoid Moiré artefacts. | |
| Random stitch length jitter | Amount to vary the length of each stitch by when randomizing (%) | |
| Random seed | Use a specific seed for randomized attributes. Uses the element ID if empty. | |
| Minimum stitch length | Overwrite global minimum stitch length setting. Shorter stitches than that will be removed. | |
| Minimum jump stitch length | Overwrite global minimum jump stitch length setting. Shorter distances to the next object will have no lock stitches | |
| Allow lock stitches | Enables lock stitches in only desired positions | |
| Force lock stitches | ☑ | Sew lock stitches after sewing this element, even if the distance to the next object is shorter than defined by the collapse length value in the Ink/Stitch preferences. |
| Tack stitch | Chose your favorite style | |
| Scale Tack stitch | ||
| Lock stitch | Chose your favorite style | |
| Scale Lock stitch | ||
| Trim After | ☑ | Trim the thread after sewing this object. |
| Stop After | ☑ | Stop the machine after sewing this object. Before stopping it will jump to the stop position (frame out) if defined. |
Underlay
Underlay in Linear Gradient Fill is the same as for Auto Fill and uses the fill angle which can be defined in the underlay params.