Manual Stitch
What it is
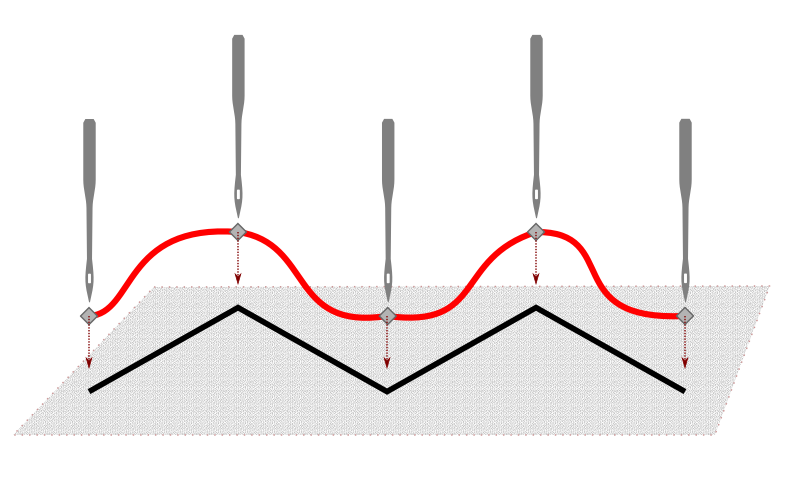
 Manual stitches are create by using each node of a path as a needle penetration point.

How to Create
- Create a path. The line style or width are not used in the creation of a manual stitch.
- Open
Extensions > Ink/Stitch > Params. - Chose
Manual stitch placement
Each node of a path represents a needle penetration point. It doesn’t care about bezier curves.
A clean representation of your manual stitch path can be achieved as follows:
- Select all nodes (
F2thenCtrl+A) - Click on
 in the
 Tool Controls Bar.
Params
Open Extensions > Ink/Stitch > Params to change parameters to your needs.
| Settings | Description |
|---|---|
| Running stitch along paths | Must be enabled for these settings to take effect. |
| Method | Choose manual stitch |
| Bean stitch number of repeats | ◦ Enable Bean Stitch Mode ◦ Backtrack each stitch this many times. ◦ A value of 1 would triple each stitch (forward, back, forward). ◦ A value of 2 would quintuple each stitch, etc. |
| Max stitch length | Stitches longer than this will be subdivided. Leave empty for no subdivision. |
| Minimum stitch length | Overwrite global minimum stitch length setting. Shorter stitches than that will be removed. |
| Minimum jump stitch length | Overwrite global minimum jump stitch length setting. Shorter distances to the next object will have no lock stitches. |
| Allow lock stitches | Usually manual stitches to not add lock stitches automatically and you have to include them directly into your path. But you can enable them through the setting force lock stitches. |
| Force lock stitches | Enables lock stitches for manual stitches. |
| Trim After | Trim the thread after sewing this object. |
| Stop After | Stop the machine after sewing this object. Before stopping it will jump to the stop position (frame out) if defined. |
